Team Permissions: User Roles and Access Control
Overview
Running an organisation on Seaty often involves a team of people with different responsibilities. Permissions let you control who can access your organisation and exactly what they can do. This keeps sensitive operations protected whilst giving your team the access they need to do their jobs.
At its simplest, permissions answer one question: Who should be able to do what?
Who uses this: Organisation administrators managing team access.
Key capabilities:
- Add team members to your organisation
- Create custom roles that group permissions together
- Assign roles to users for consistent access across teams
- Grant administrator access for full control
- Remove users or change their access at any time
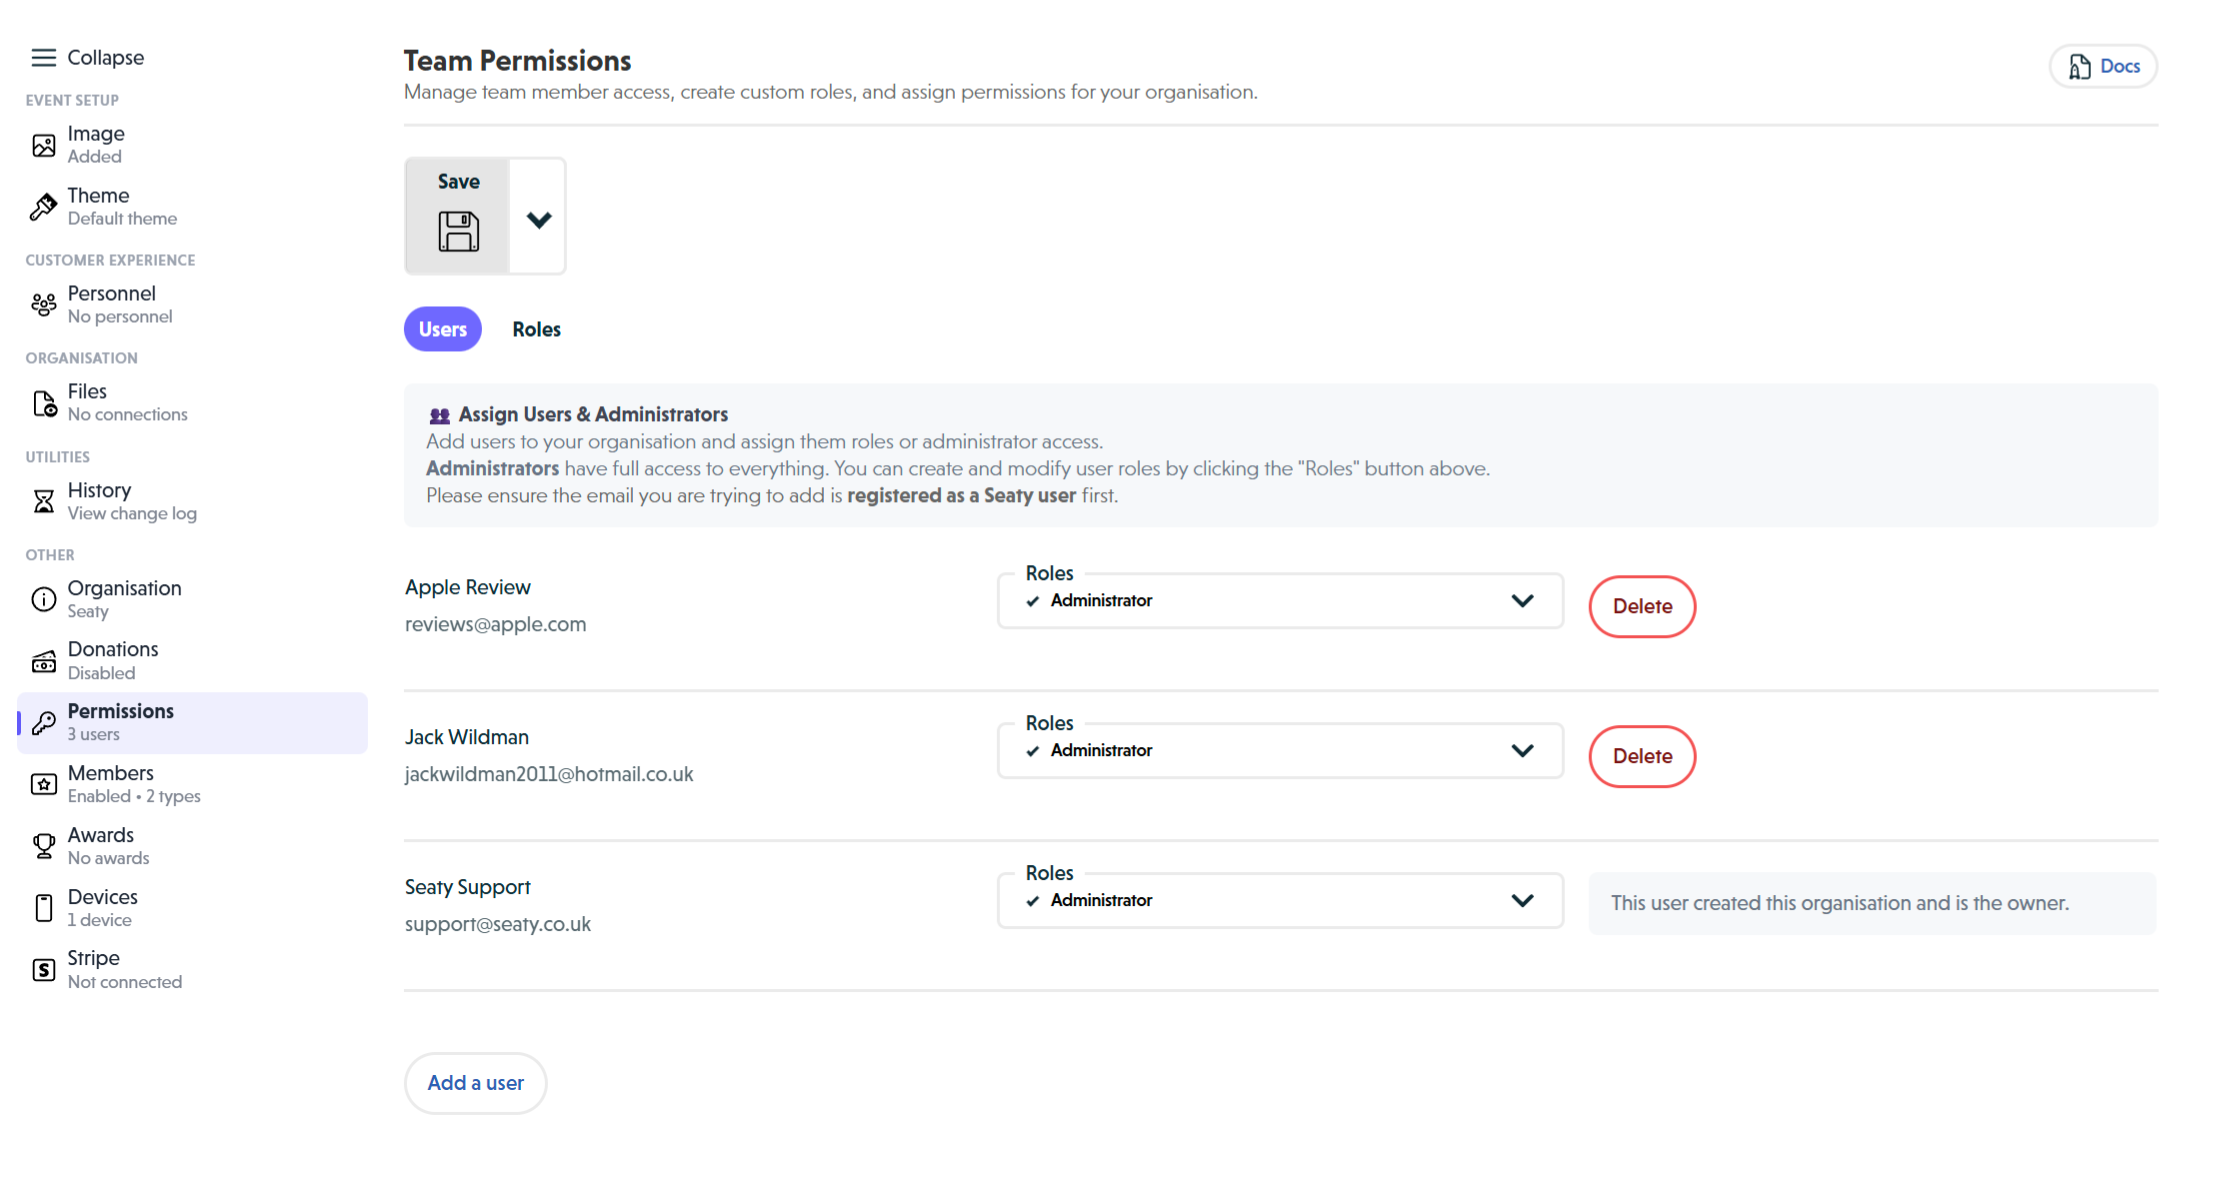 Users tab showing team members with Administrator roles, owner indicator, and Add a user button
How It Works
At a glance: Permissions follow a simple journey from adding users to granting them the right level of access.
1. Add team members to your organisation
You start by adding users to your organisation. Each person needs their own Seaty account, then you can search for them by name or email and add them to your team.
2. Create roles for common responsibilities
Instead of setting permissions for each user individually, you create roles that match your team structure. A "Box Office" role might include permissions for finding orders and checking people in. A "Finance" role might include banking and export permissions.
3. Assign roles to users
Once your roles are set up, you assign them to users. Each user can have multiple roles, and the permissions from all their roles combine together. You can also grant administrator access to trusted senior staff who need full control.
4. Review and adjust as needed
As your team changes, you can add new users, create new roles, or adjust permissions. When you remove a role, users with that role immediately lose those permissions.
Think of it this way:
- Users are the people who access your organisation
- Roles are named groups of permissions you can reuse
- Permissions are the specific capabilities that control what someone can do
Understanding Permission Levels
Administrator Access
Administrators have complete access to everything in your organisation automatically.
What administrators can do:
- Access all events, orders, and financial data
- Edit organisation settings and branding
- Manage all team members and permissions
- Create and edit events
- Process refunds and manage payments
- Export all data and reports
- No permission restrictions apply
When to grant administrator access:
- Senior managers and directors
- Finance team members who need full financial access
- Technical staff managing the platform
- Anyone who needs unrestricted access
Security consideration: Only grant administrator access to fully trusted team members.
Role-Based Access
Roles let you create custom permission groups that you can assign to multiple users. This is ideal for teams with repeating access patterns.
Benefits of using roles:
- Assign multiple permissions at once
- Consistent access across team members
- Easy to update permissions for entire groups
- Better organisation for larger teams
Common role examples:
- Finance Team - Banking, withdrawals, statements, export data
- Box Office - Find orders, balances, requests, admissions
- Marketing - Mail, feed, events, summary
- Event Coordinators - Event editing, scans, admits, locks
- Support Staff - View orders, resend emails, ticket flags
Individual Permissions
Individual permissions give precise control over specific capabilities. Grant only the permissions each user needs.
Permission groups:
Event Permissions
Control access to event-specific features:
- Find orders - Search for orders with attendee and ticket details
- Summary - Event metrics, sales figures, and statistics
- Banking & withdrawals - Financial management and withdrawals
- Feed - Activity log showing recent orders and refunds
- Balances - Current attendee balances
- Requests - View and manage ticket requests
- Scans - View ticket scan history
- Admit & redeem - Admit attendees and redeem tickets
- Locks - Lock or unlock event tickets
- Blank ticket - Issue unassigned tickets
- Mail - Send emails to attendees
- Edit - Full event editing rights
- Reporting - Access reports and export event data
- Event admin files - Access shared files for the event
- Schedule - View and manage event schedule and attendance tracking
Organisation Permissions
Control organisation-wide access:
- Summary - Organisation dashboard and metrics
- Events - View all organisation events
- Attendees - Access attendee lists across all events
- Compare events - Performance comparison between events
- Tours - Manage multi-event tours
- Statements - View and download attendee statements
- Members - Manage organisation members
- Edit - Full organisation editing rights
- Reporting - Access organisation-wide reports and data exports
- Mail - Send emails to organisation members
- Feed - Organisation activity log
- Organisation admin files - Access shared files for the organisation
- Schedule - View and manage organisation-wide schedule and attendance tracking
Tour Permissions
Control tour management access:
- Edit - Edit tour details and settings
- Events - View and manage tour events
- Summary - Tour statistics and performance
Order Permissions
Control order-specific capabilities:
- View - View order details and ticket information
- Order as an admin - Book tickets without payment with admin options
- Cancel & refund - Process cancellations and refunds
- Balance payments - Manage and record balance payments
- Transfer ownership - Transfer orders to different users
- Admin notes - Edit administrative notes
- Edit referrals - Modify referral information
- Resend email - Resend confirmation emails
- Resell - Mark tickets for resale
- Swap - Swap tickets between orders (grants limited order viewing)
- Ticket flags - Flag tickets for review or special handling
Managing Users
Adding Team Members
- Navigate to the Users tab in the Permissions section
- Click "Add a user" at the bottom
- Search for the user by name or email
- Select the user from the search results
- Click to add them to your organisation
The new user appears in your user list where you can assign roles and permissions.
Important: If you can't find a user, they need to create a Seaty account first.
Assigning Roles to Users
Once a user is added:
- Find the user in the Users list
- Click the Roles dropdown next to their name
- Select one or more roles to assign:
- Administrator - Full access to everything
- Custom roles - Any roles you've created
- The dropdown shows your selected roles
- Click Save at the top to apply changes
Tip: Users can have multiple roles. All permissions from all assigned roles combine together.
Viewing User Permissions
To see what a user can do:
- Find the user in the list
- Check the Roles dropdown to see their assigned roles
- Each role lists its included permissions
- Administrators automatically have all permissions
Removing User Access
To remove someone from your organisation:
- Find the user in the Users list
- Click "Delete" next to their name
- Confirm the removal
Note: You cannot remove the organisation owner - the person who created the organisation.
Managing Roles
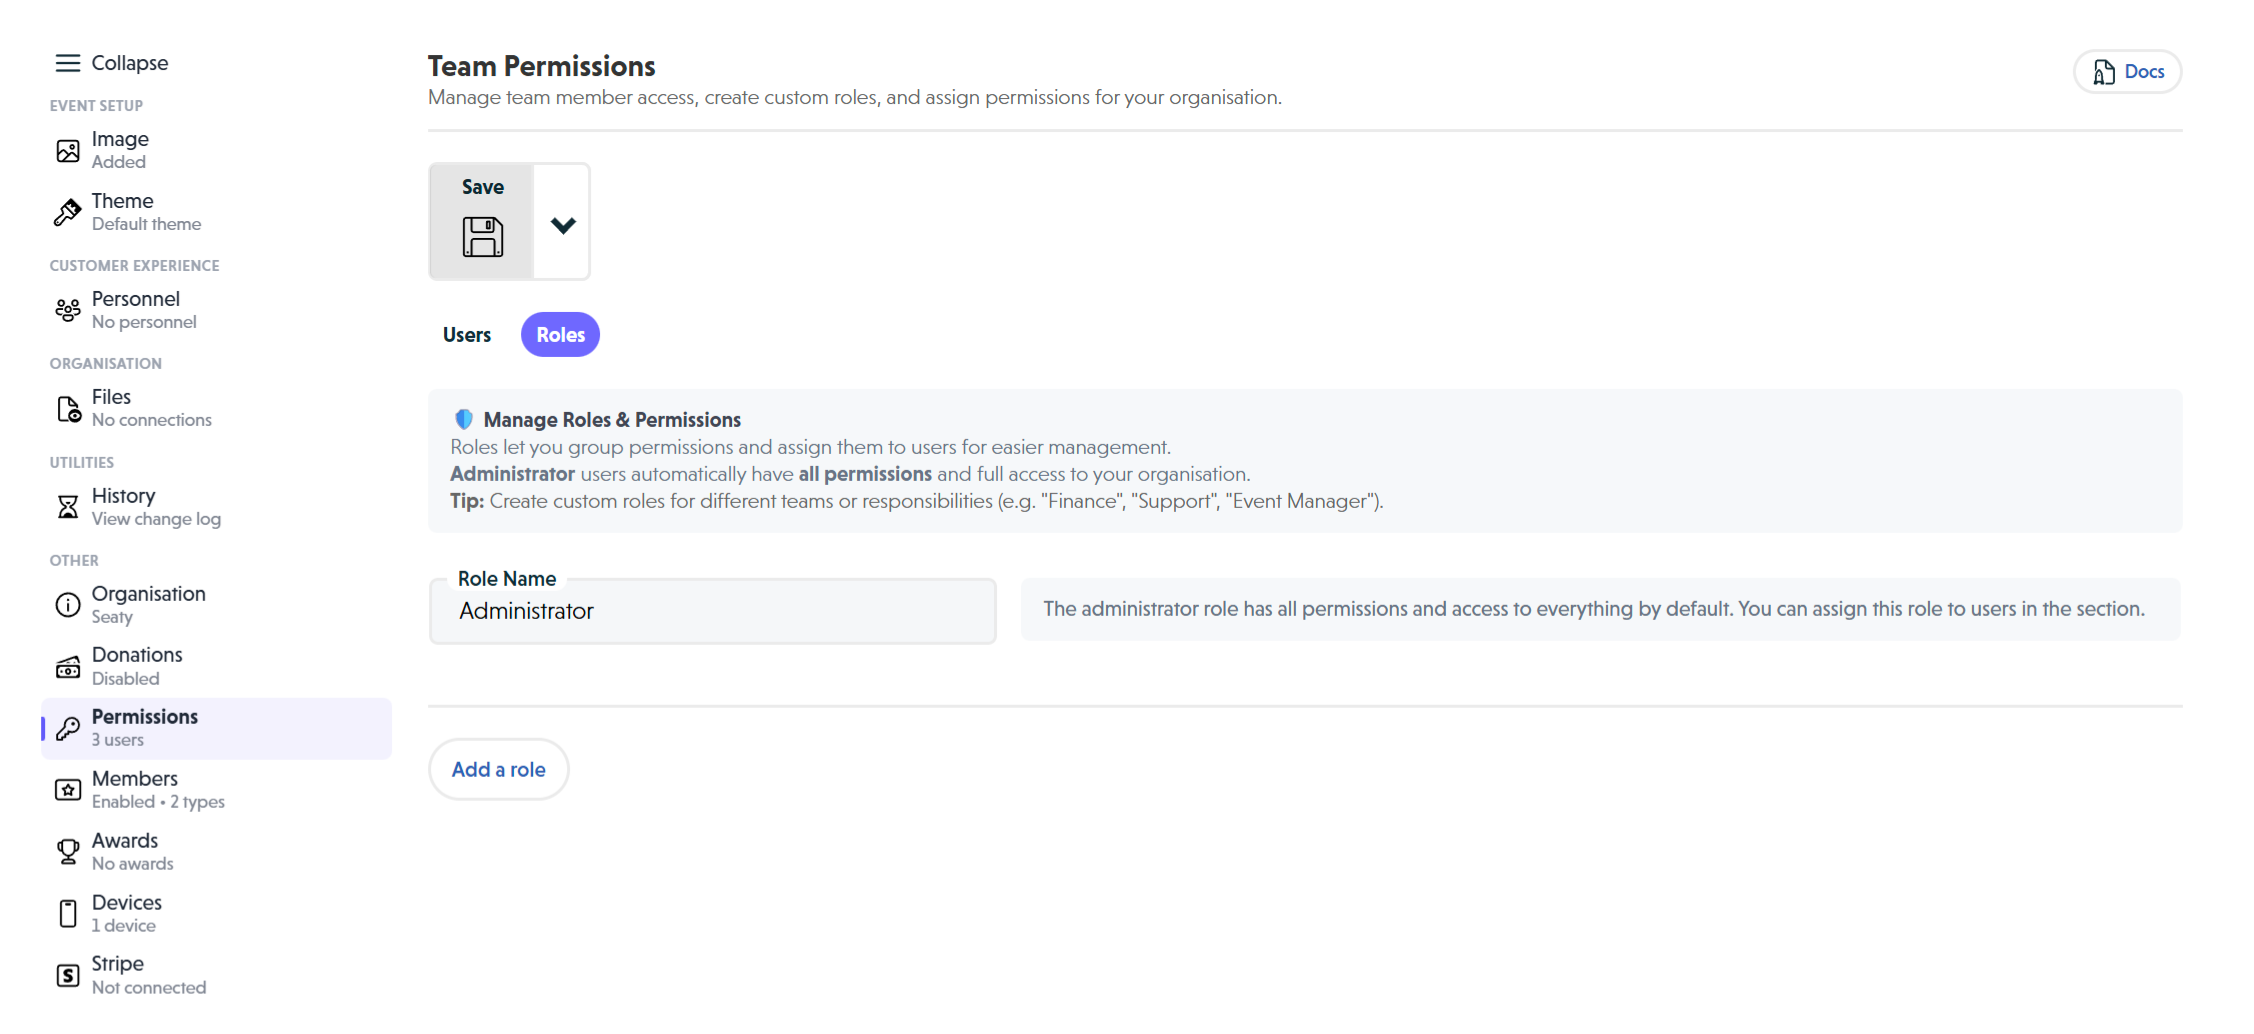 Roles tab showing the built-in Administrator role and Add a role button
Creating Custom Roles
- Navigate to the Roles tab in the Permissions section
- Click "Add a role" at the bottom
- A new role section appears
- Enter a Role Name (e.g., "Finance Team", "Box Office", "Event Manager")
- Click the Permissions dropdown
- Select all permissions this role needs
- Click Save at the top
Your new role is now available to assign to users.
Best practice: Create roles that match your team structure and common responsibilities.
Editing Role Permissions
To modify an existing role:
- Navigate to the Roles tab
- Find the role you want to edit
- Update the Role Name if needed
- Click the Permissions dropdown
- Add or remove permissions as needed
- Click Save at the top
All users with this role automatically receive the updated permissions.
Viewing Role Permissions
Each role displays its permissions in two ways:
- Permission dropdown - Shows all selected permissions organised by category
- Summary below - Lists permissions grouped by Event, Organisation, Tour, and Order
The summary helps you quickly verify what access a role provides.
Deleting Roles
To remove a role:
- Navigate to the Roles tab
- Find the role you want to delete
- Click "Delete" at the bottom of the role section
- Confirm the deletion
- Click Save at the top
Important: Users who had this role lose those permissions immediately. Reassign appropriate roles or permissions first.
The Administrator Role
What Makes Administrators Special
The Administrator role is built-in and cannot be modified:
- Automatically grants all permissions across your organisation
- Users see "Administrator" in their role list
- Cannot be edited or deleted
- Works across all events and organisation features
- Bypasses all permission checks
Administrator vs Custom Roles
Administrators:
- Have complete unrestricted access
- Perfect for senior staff and managers
- Simpler permission model
- Cannot have permissions removed
Users with custom roles:
- Have precisely controlled access
- Perfect for specific responsibilities
- More secure for limited-trust scenarios
- Permissions can be adjusted over time
Organisation Owner
The person who created the organisation is the owner:
- Automatically has administrator access
- Cannot be removed from the organisation
- Cannot have administrator access removed
- This ensures organisations always have at least one administrator
Permission Strategy Best Practices
Start with Roles
Create roles before adding users:
- Identify common team functions
- Create roles for each function
- Assign appropriate permissions to each role
- Add users and assign their roles
This approach scales better as your team grows.
Principle of Least Privilege
Grant the minimum permissions needed:
- Start with fewer permissions
- Add more as needed
- Review permissions regularly
- Remove unnecessary access
This reduces security risks and prevents accidental changes.
Grouping Permissions Logically
When creating roles, group related permissions:
Box Office Role might include:
- Find orders
- Balances
- Admit & redeem
- Resend email
Finance Role might include:
- Banking & withdrawals
- Summary
- Reporting
- Statements
Event Manager Role might include:
- Event edit
- Find orders
- Scans
Use Descriptive Role Names
Choose clear, descriptive role names:
- ✅ "Box Office Staff"
- ✅ "Finance Team - Full Access"
- ✅ "Marketing and Communications"
- ✅ "Event Coordinators"
- ❌ "Role 1"
- ❌ "Users"
- ❌ "Staff"
This helps you and your team understand access at a glance.
Regular Permission Audits
Review team access regularly:
- Check who has administrator access
- Review custom role permissions
- Remove users who no longer need access
- Update roles as responsibilities change
- Verify new team members have appropriate access
Recommended: Audit permissions quarterly or when team members change.
Common Permission Scenarios
Box Office Team Member
Needs: Process orders, check attendees in, handle enquiries
Recommended permissions:
- Find orders
- Balances
- Admit & redeem
- Resend email
- Order view
Create a "Box Office" role with these permissions
Finance Manager
Needs: Complete financial access and reporting
Recommended approach: Grant administrator access
Alternatively, create a "Finance" role with:
- Banking & withdrawals
- Summary (Event and Organisation)
- Reporting (Event and Organisation)
- Statements
- Order view
- Cancel & refund
Marketing Coordinator
Needs: Send communications, view metrics, promote events
Recommended permissions:
- Mail (Event and Organisation)
- Summary (Event and Organisation)
- Events
- Feed
- Attendees
Create a "Marketing" role with these permissions
Event Duty Manager
Needs: Manage specific events on event days
Recommended permissions:
- Find orders
- Summary
- Feed
- Scans
- Admit & redeem
- Locks
- Order view
- Resend email
Create an "Event Manager" role with these permissions
Tour Coordinator
Needs: Manage multi-event tours
Recommended permissions:
- Tour edit
- Tour events
- Tour summary
- Event summary
- Find orders
Create a "Tour Coordinator" role with these permissions
Technical Support
Needs: Help customers with order issues
Recommended permissions:
- Find orders
- Order view
- Resend email
- Transfer ownership
- Swap
- Ticket flags
Create a "Support" role with these permissions
Security Best Practices
Note: It's better to start with fewer permissions and add more as needed than to grant too much access initially.
Protect Administrator Access
- Only grant to fully trusted team members
- Minimum number of administrators needed
- Review administrator list regularly
- Use role-based permissions for most users
Verify User Identities
Before adding users:
- Confirm their Seaty account email
- Verify they're the correct person
- Check they still need access
- Document why they need access
Monitor Permission Changes
Keep track of permission changes:
- Note when roles are created or modified
- Document why specific permissions were granted
- Review changes if unexpected behaviour occurs
- Consider who made changes when troubleshooting
Remove Access Promptly
When team members leave:
- Remove them from the Users list immediately
- Review any roles they were in
- Consider if roles need updating
- Document the removal
Communicate Permission Limits
Ensure team members understand:
- What they can and cannot do
- Why certain permissions are restricted
- Who to contact for additional access
- The importance of not sharing accounts
Use Separate Accounts
Never share login credentials:
- Each person needs their own Seaty account
- Assign appropriate permissions to each account
- This maintains proper audit trails
- Enables individual accountability
Common Questions
Users and Access
Can I add someone who doesn't have a Seaty account?
No. Each person needs to create their own Seaty account first. Once they have an account, you can search for them by name or email and add them to your organisation.
Why can't I find the user I'm trying to add?
The user may have registered with a different email address, or they haven't created an account yet. Confirm the exact email they used when signing up. You can also try searching by their name instead of email.
Can I remove the organisation owner?
No. The person who created the organisation is the owner and cannot be removed. This ensures every organisation always has at least one administrator.
What happens when I remove a user?
They immediately lose all access to your organisation, events, and data. They can no longer view orders, send emails, or perform any actions that required their permissions.
Roles and Permissions
Can a user have multiple roles?
Yes. Users can have as many roles as you assign. All permissions from all their roles combine together. For example, if someone has both a "Box Office" role and a "Marketing" role, they get all permissions from both.
What's the difference between Administrator and custom roles?
Administrators automatically have all permissions and full access to everything. Custom roles only grant the specific permissions you select. Use Administrator for trusted senior staff; use custom roles for everyone else.
Do I need to create roles, or can I just make everyone an Administrator?
You can make everyone an Administrator, but this is not recommended. Roles let you give people exactly the access they need without exposing sensitive features. Start with fewer permissions and add more as needed.
What happens if I delete a role that users have?
Users who had that role immediately lose those permissions. Before deleting a role, consider reassigning affected users to a different role or creating a replacement role first.
Troubleshooting
A team member says they can't access a feature. What should I check?
Check their assigned roles in the Users tab. Then check the Roles tab to see what permissions those roles include. Add the missing permission to an existing role, or assign an additional role that includes it. Always click Save after making changes.
I made changes but they're not taking effect. Why?
Make sure you clicked Save at the top after making changes. If you did save, ask the affected user to log out and log back in. Their session may be using cached permissions from before your changes.
Why do we have so many Administrators?
This often happens when Administrator access is granted instead of creating appropriate roles. Review who genuinely needs full access. For most team members, a custom role with specific permissions is more appropriate and more secure.