Event Schedule: Rehearsals, Meetings and Performance Times
 Schedule page showing event schedule
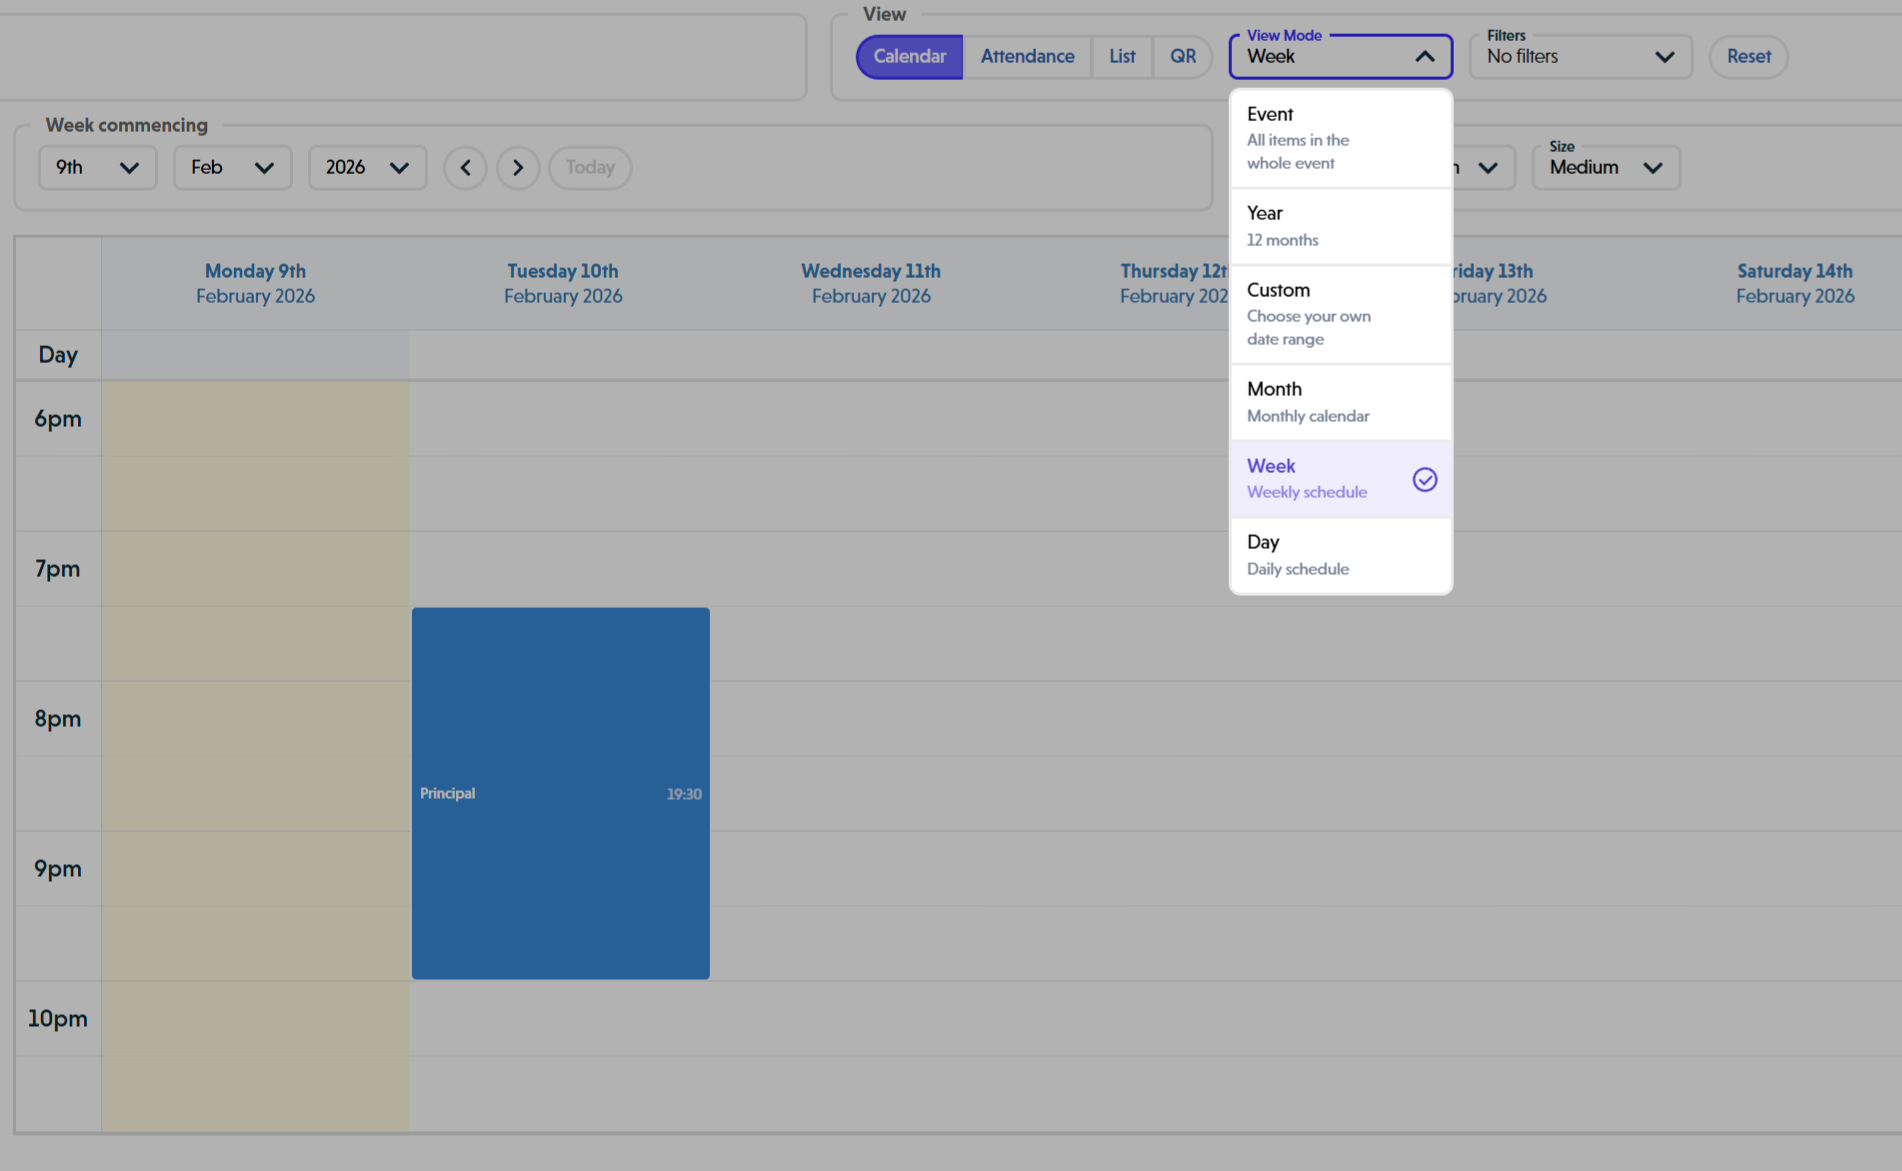 View Mode dropdown showing Event, Year, Custom, Month, Week, and Day options
Overview
Running a Seaty event involves more than selling tickets. There are rehearsals to organise, meetings to plan, and people to coordinate behind the scenes. Schedule Management helps you plan and track all the activities that happen around your event, not the audience on the night.
This system is designed for internal activities: rehearsals, meetings, auditions, fundraisers, social events, and deadlines. These are for the people delivering the event, not the customers buying tickets.
Who uses this: Event administrators with Event Schedule permission.
At its simplest, the schedule answers one question: Where do I need to be, and when?
Key capabilities:
- Create single or recurring schedule items across weeks or months
- Choose from schedule item types with colour coding
- View your calendar in 6 different modes (Event, Year, Custom, Month, Week, Day)
- Share the schedule with organisation members
- Track attendance with QR code check-ins
- View attendance in a matrix showing members vs schedule items
- Export attendance data to CSV
- Filter by item type using a multi-select dropdown
- Drag and drop items to reschedule (when drag-to-edit is enabled)
- Edit, cancel, restore, or delete items individually or as a series
- Control visibility (Admin Only or Admin and Members)
How It Works
At a glance: Schedule management follows a simple journey from planning to participation tracking.
1. Plan activities around the event
You start by creating schedule items for your event. These might be rehearsals, meetings, auditions, or social sessions. You can create them as one-offs, or set them to repeat across weeks or months.
Each item has a clear type and colour, a date and time, and optional details like location and notes. As soon as it's created, it appears in a shared visual calendar, so everyone sees the same up-to-date plan. You can view it by day, week, month, or across the full event timeline.
2. Share the schedule with the people involved
Once the schedule is in place, it's shared with the people involved in delivering the event.
Admins and organisation members can view the schedule. This includes performers, directors, crew, volunteers, committee members, and support roles. People can browse activities by date or type, click into items for full details, and quickly understand what's happening and when.
No tickets are involved here. These schedule items are for rehearsals, meetings, and internal activities, not ticketed performances.
3. Check in to scheduled activities
When a scheduled activity takes place, Seaty supports simple check-in for that specific session.
Each schedule item includes a protected QR code and a direct check-in link that admins can choose to share at the venue. On arrival, people scan the code or open the link, sign in if needed, and check in with a single action.
Seaty records who took part in the activity, when they arrived, and how long they stayed when they check out. Non-members such as parents, visitors, or contractors can also check in by providing their role. Members can check in guests on their behalf when needed.
This is designed to stay out of the way. No searching, no lists, and no admin involvement on the day.
4. Participation is tracked automatically
While people are checked in, participation is tracked automatically in the background.
Multiple check-ins and check-outs are supported, and accidental early check-outs are protected with simple warnings. For participants, it just works. For organisers, it creates accurate, timestamped records of who took part in each scheduled activity.
5. Review participation over time
After or during a session, admins can review everything in one place.
They can see who attended each rehearsal or meeting, who didn't, how long people stayed, and how participation changes over time. The schedule attendance matrix gives a clear overview of people versus activities, making patterns and gaps easy to spot. Data can also be exported for reporting, funding, or compliance.
Think of it this way:
- Events sell tickets to customers
- Schedules organise the people delivering the event
- Attendance records who took part in those activities
Understanding Schedule Item Types
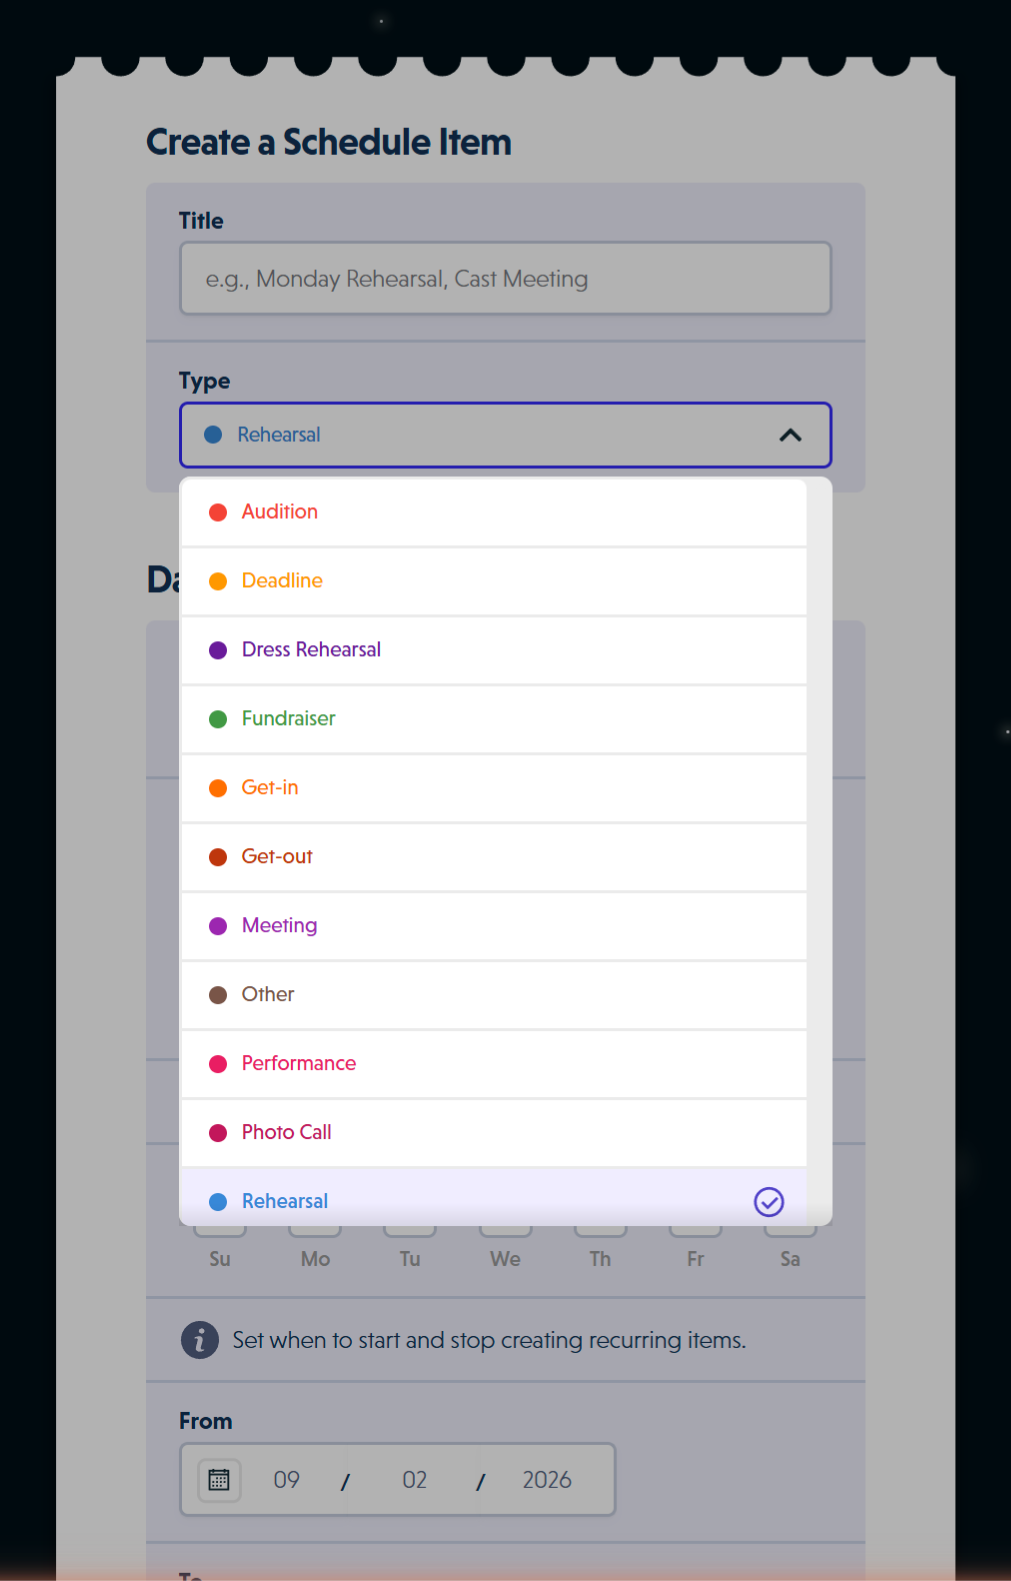 Schedule item type dropdown showing all available types with colour coding
Each schedule item belongs to one of a range of types. Each type has a distinct colour to help you quickly identify activities on your calendar.
| Type | Colour | Common Uses | When to Use |
|---|---|---|---|
| Rehearsal | Blue | Cast rehearsals, technical rehearsals, dress rehearsals | Regular practice sessions, run-throughs |
| Meeting | Purple | Production meetings, committee meetings, planning sessions | Team discussions, planning sessions |
| Audition | Red | Audition slots, callbacks, casting sessions | Recruiting performers or crew |
| Fundraiser | Green | Fundraising events, sponsored activities, charity nights | Revenue-generating activities |
| Deadline | Orange | Ticket sales deadlines, submission deadlines, payment dates | Time-sensitive milestones |
| Social | Cyan | Cast socials, team building, celebration events | Non-rehearsal team activities |
| Event Date | Purple | Actual performance dates (automatically created from your event dates) | Never (created automatically) |
| Other | Brown | Any activity that doesn't fit the categories above | Miscellaneous activities |
The Event Date type is special: these items are automatically created based on your event's performance dates and cannot be manually created as schedule items.
Beyond the common types above, there are also dedicated types for technical and dress rehearsals, get-in and get-out, performances, training, workshops and photo calls, so the calendar reflects how a production actually runs.
Creating Schedule Items
 Create a Schedule Item form showing title, type, date and time options, and recurring checkbox
Single Schedule Items
Validation Requirements:
- Title is required (maximum 200 characters)
- Timed events must have both start and end date/time
- End time must be after start time
- Events must be at least 5 minutes long (prevents accidental very short items)
- If adding full address, both street address and postcode are required
To create a one-time schedule item:
-
Click "Add item" or click any date on the calendar
-
Enter basic details:
- Title (required, maximum 200 characters)
- Type from the dropdown
-
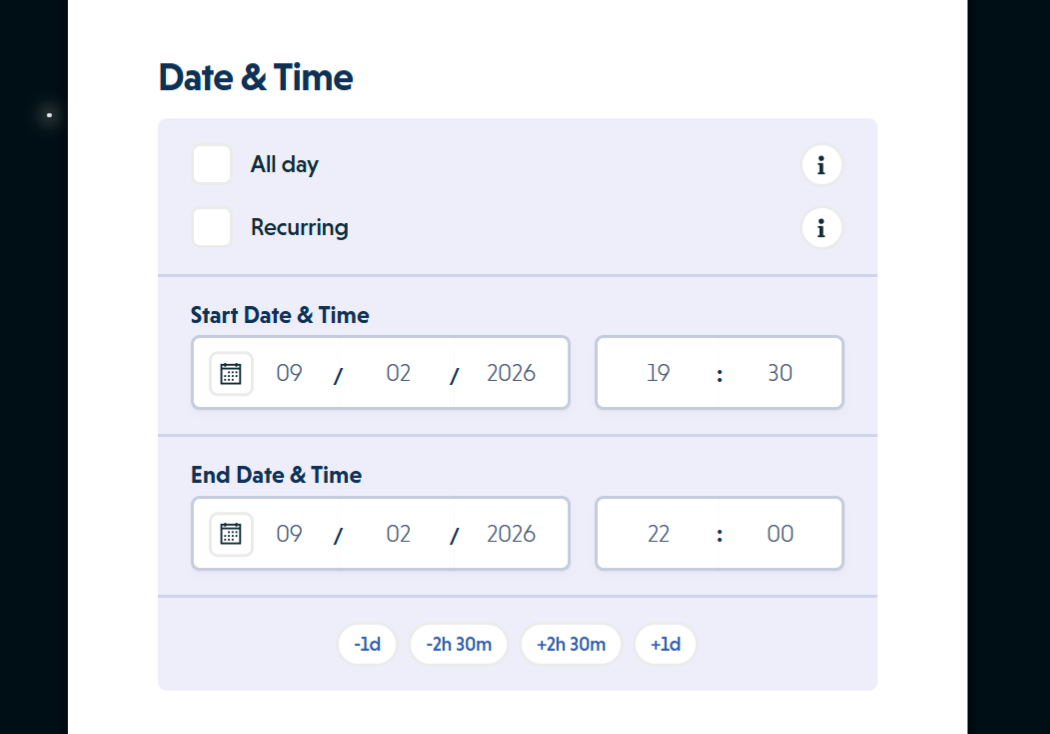
Choose date and time settings:
- Leave "All day" unchecked for timed events with specific start and end times
- Check "All day" for events that last the entire day
 Create form details section showing description, location, visibility, and validation
-
Add optional details:
- Description: Rich text with formatting and images (5,000 character maximum)
- Location: Venue name or room (200 character maximum)
- Full address: Optional street address, town, and postcode for directions
-
Set visibility:
- Leave "Visible to admins only" unchecked to make this visible to organisation members
- Check it to restrict visibility to administrators only
-
Click "Create schedule item"
Why the 5-minute minimum? This prevents accidentally creating very short items (e.g., 1-minute rehearsals) which are usually data entry errors.
Why require address fields? If you want to provide directions, both street address and postcode are needed for mapping services to work correctly.
What Happens After Creating Items
When you create a schedule item:
- The calendar immediately updates to show your new item with its type colour
- The item appears in all relevant calendar views (Event, Month, Week, Day)
- If set to "Admin and Members" visibility, organisation members can now see it
- QR code is automatically generated for attendance tracking
- The item becomes available for editing, cancelling, or deletion
Recurring Schedule Items
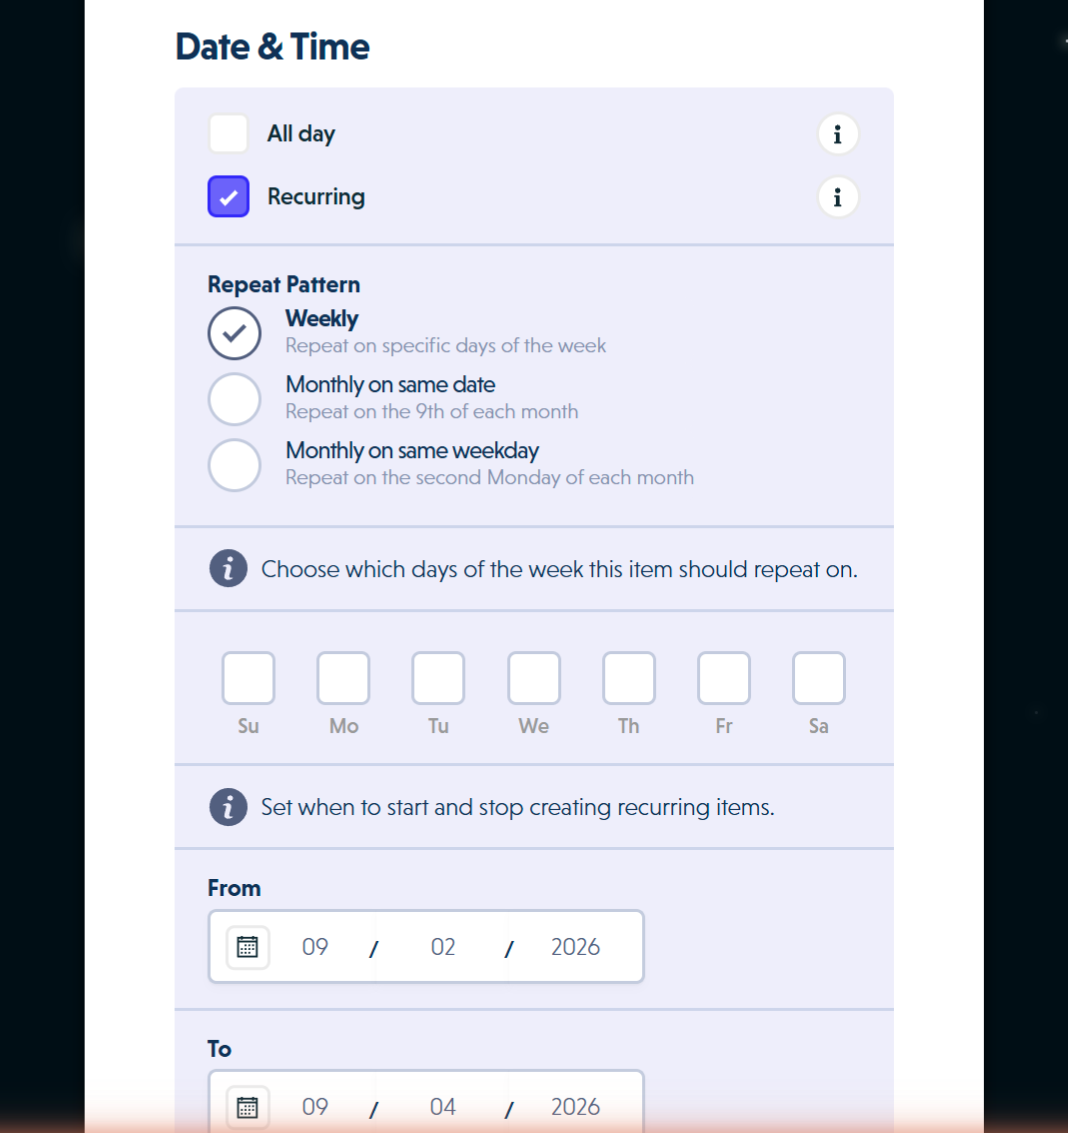 Recurring pattern options showing Weekly, Monthly on same date, and Monthly on same weekday with day-of-week selectors
To create multiple items that repeat on specific days:
- Click "Add item"
- Enter title and type as above
- Check the "Recurring" checkbox
Choose Your Repeat Pattern
Weekly Pattern:
- Select which days of the week this item repeats on (Monday, Tuesday, etc.)
- Can select multiple days
- Creates items on those specific weekdays between your start and end dates
Monthly on Same Date:
- Repeats on the same day number each month (e.g., 15th of every month)
- Select the day of the month from the dropdown (1st through 31st)
- Skips months that don't have that date
Monthly on Same Weekday:
- Repeats on the same weekday position each month (e.g., "second Tuesday")
- Choose which week of the month (first, second, third, fourth, last)
- Choose which day of the week
- "Last" means the final occurrence of that weekday in the month
Set Date Range and Time
-
Set the date range:
- From: First date to start creating items
- To: Last date to stop creating items (inclusive)
-
For timed events (not all-day):
- Start Time: What time each item starts (24-hour format)
- Duration: How long each item lasts (hours and minutes)
- Smart defaults: The system automatically suggests the most common time and duration from your existing schedule items
-
Add description, location, and visibility settings
Review and Create
-
Review the summary showing how many items will be created
-
Click "Create X items" to generate the entire series (button text changes from "Create schedule item" to show the count)
Example: Creating weekly Monday and Wednesday rehearsals from 1st March to 30th April at 7:00pm for 2 hours would create approximately 17 items (8-9 Mondays + 8-9 Wednesdays).
The system shows you exactly how many items will be created before you confirm. If you select a weekly pattern but don't choose any days, the count will be zero and creation will be disabled.
Performance note: Creating very large recurring series (100+ items) may take a few seconds. The modal will show a loading state while items are being generated.
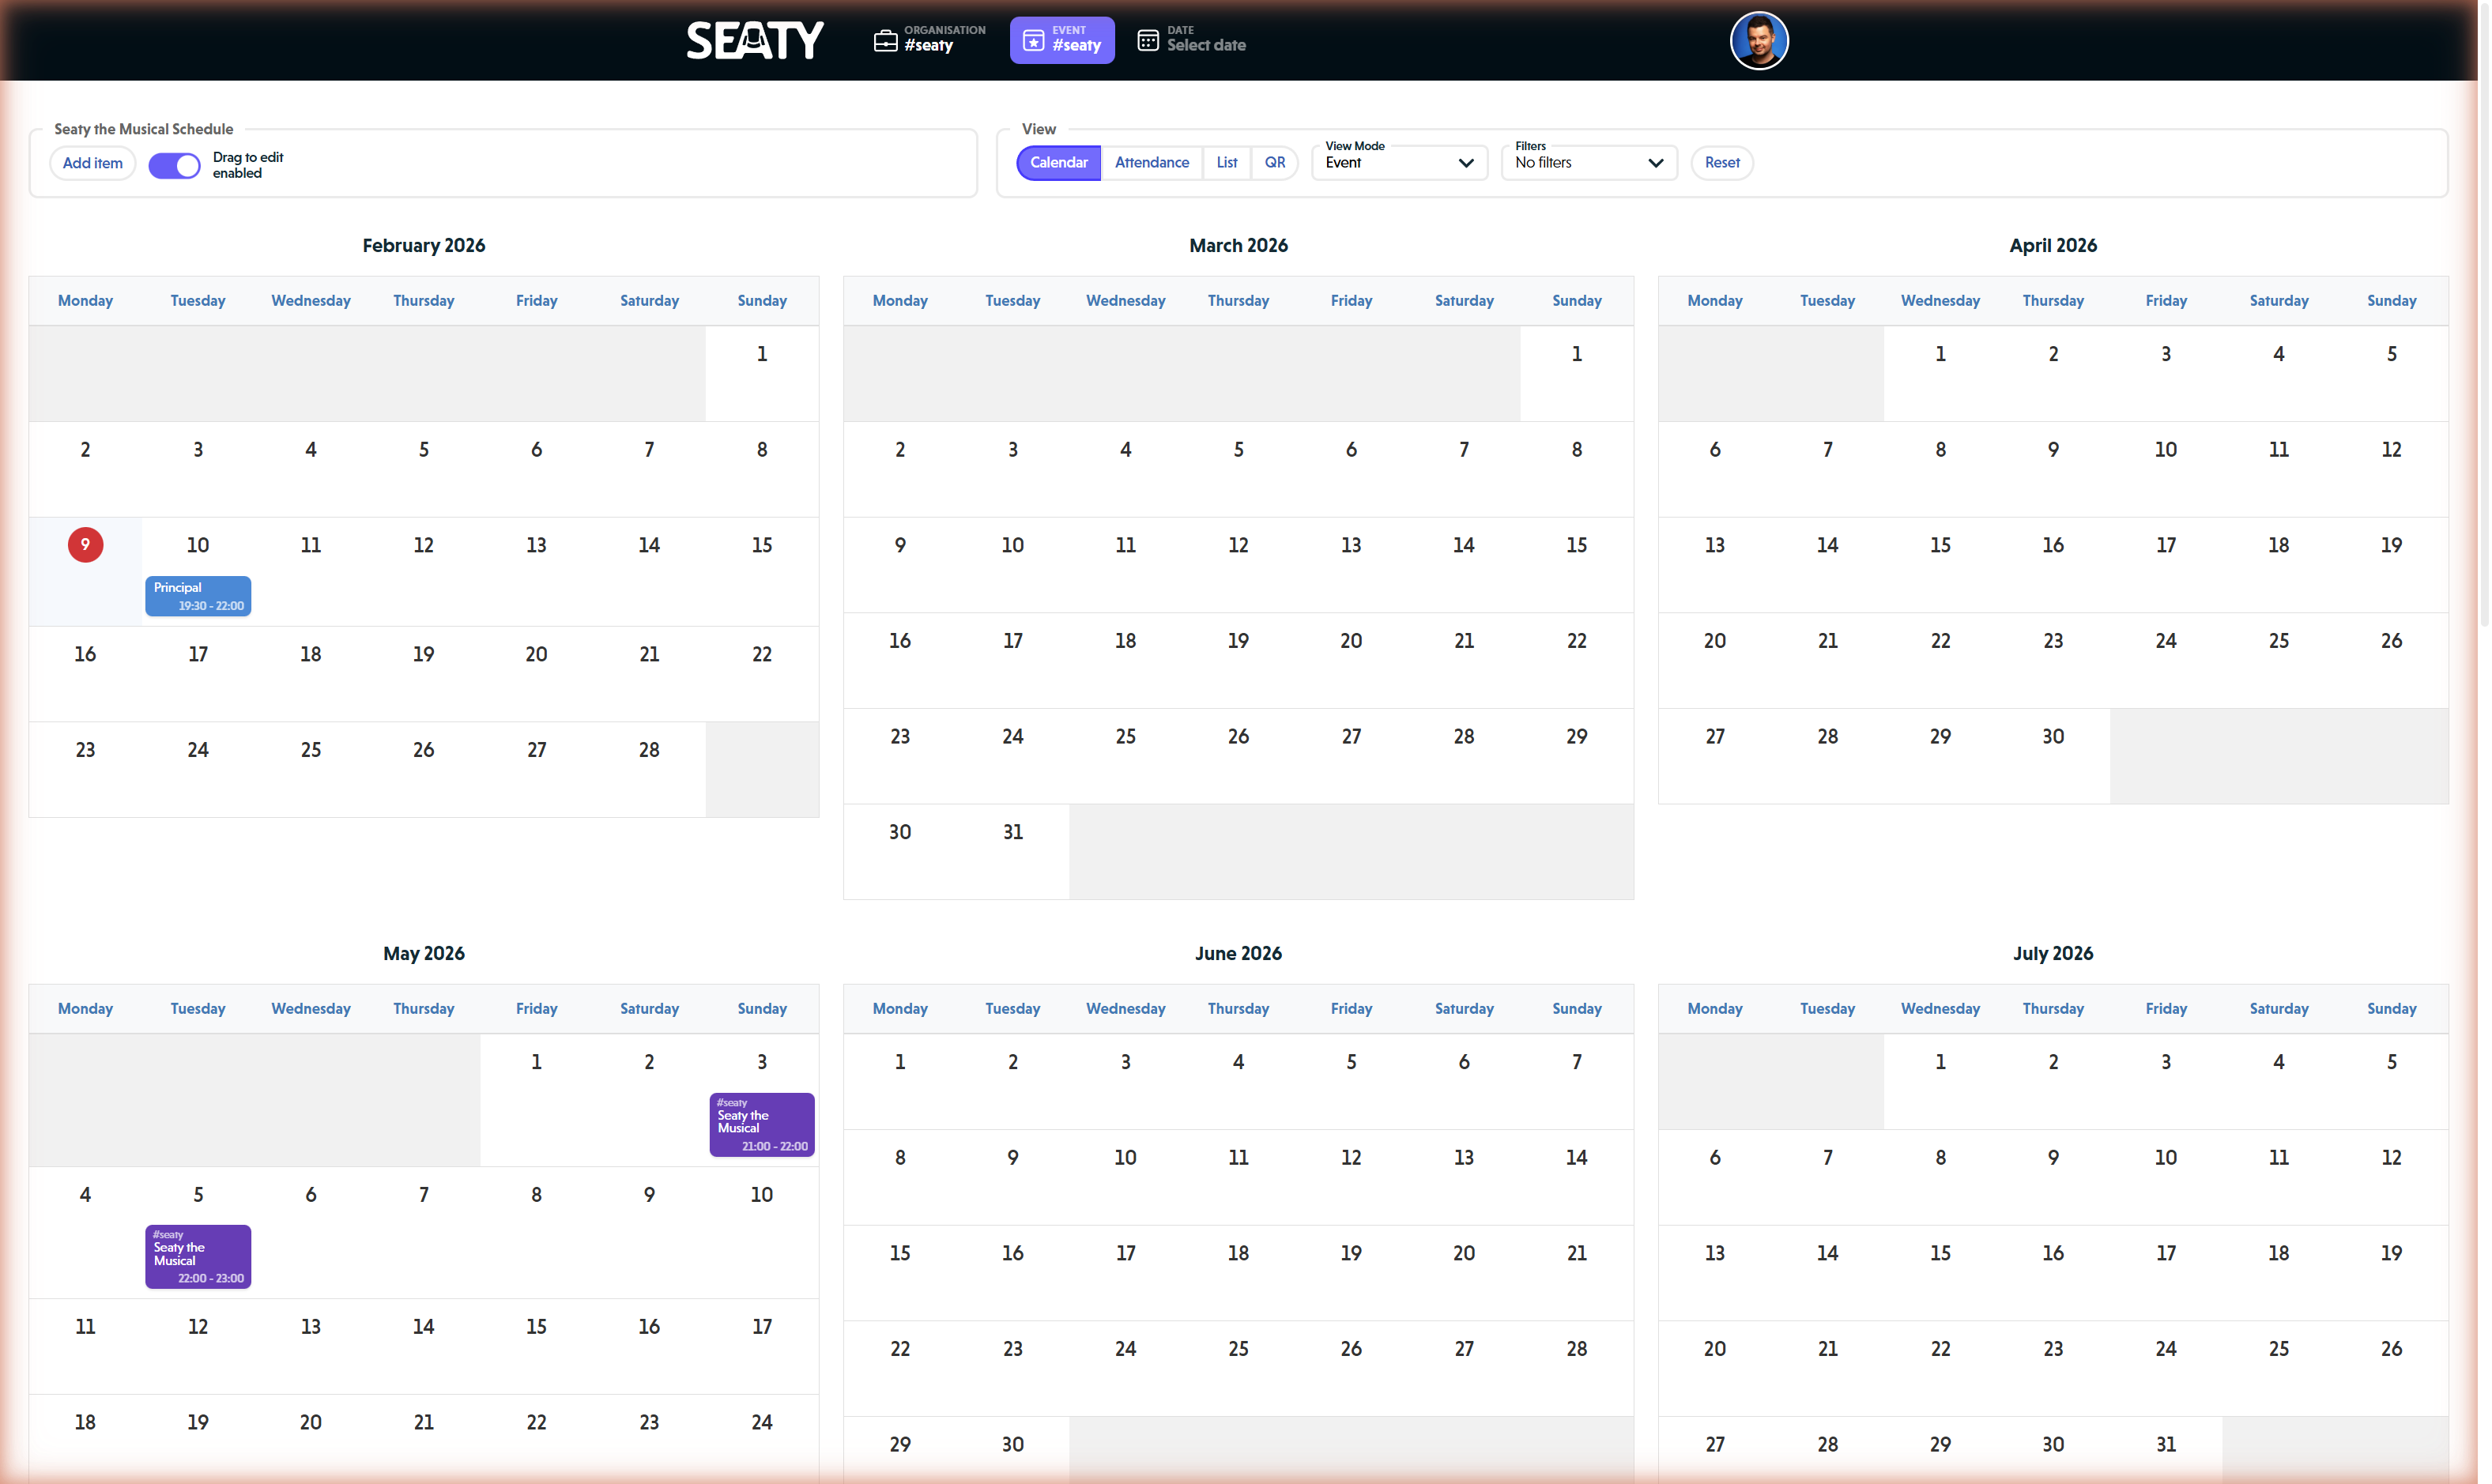
Viewing the Schedule Calendar
The schedule calendar offers seven distinct view modes to suit different planning needs.
Event View
 Event view showing full timeline across multiple months with schedule items and event dates
When to use: Viewing the full timeline of a single event from first rehearsal to final performance.
This view automatically calculates the date range from your earliest to latest schedule item or event date. It displays all months that contain activities, showing anywhere from a single month to many months depending on your event's span.
Fallback behavior: If you have no schedule items or event dates yet, Event View defaults to showing the current month to provide a starting point for creating your first items.
Year View
When to use: Getting a high-level overview of an entire year of activities.
Displays 12 months at once in a grid layout. Best for seeing patterns across seasons or identifying gaps in your schedule. Each month shows the month name and year.
Custom View
When to use: Viewing a specific date range that doesn't fit the other view modes.
Allows you to select any custom date range by choosing:
- From: Start month and year (dropdown selectors)
- To: End month and year (dropdown selectors)
Year options range from 5 years in the past to 5 years in the future from the current year. Includes navigation:
- "Previous" and "Next" arrow buttons to navigate through your date range
- "Today" button (disabled when today is within the currently visible range)
This view is useful for planning specific periods, such as a production that spans multiple months but doesn't align with standard calendar views.
3 Months View
When to use: Planning over a quarter or viewing the near-term schedule in detail.
Shows three consecutive months side-by-side. Includes custom navigation:
- "Previous" and "Next" buttons jump three months at a time
- "Today" button navigates to the current three-month period
- Title displays the range (e.g., "March – May 2025")
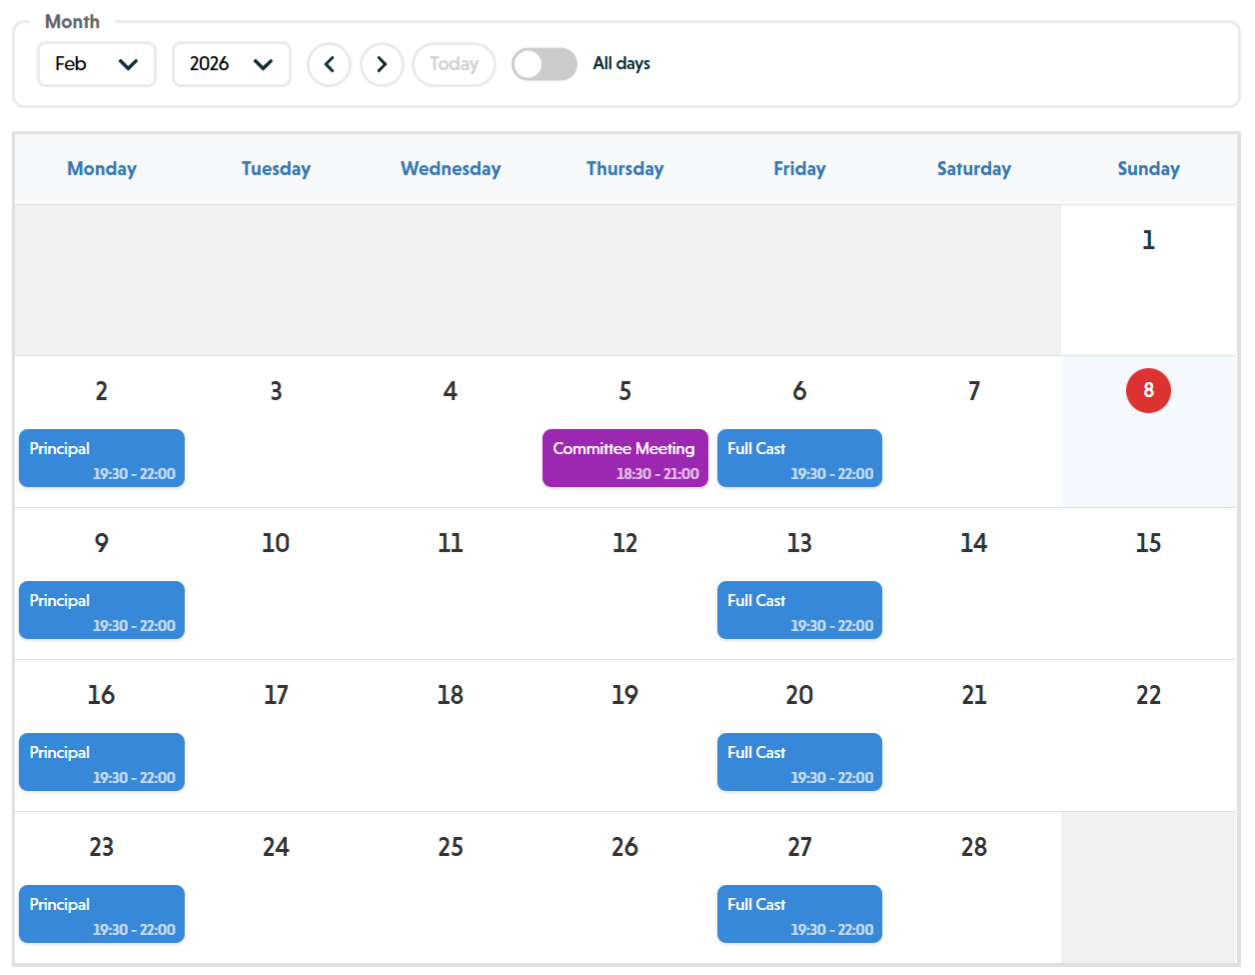
Month View
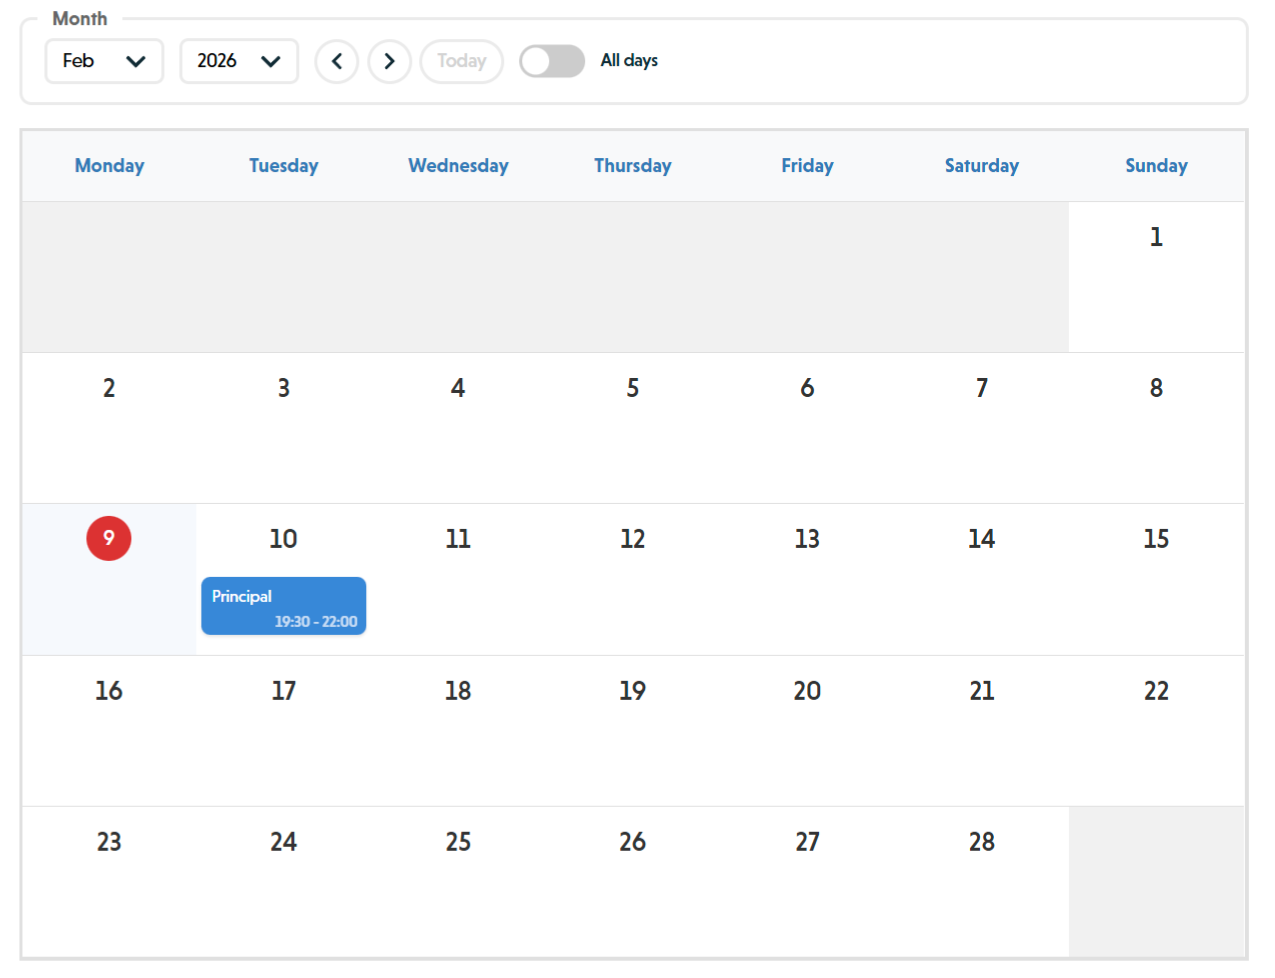 Month view calendar showing February 2026 with a Principal rehearsal on the 10th
When to use: Day-by-day planning within a single month.
Standard calendar month grid showing all days. Includes standard FullCalendar navigation (previous month, next month, today). Shows event titles with start times.
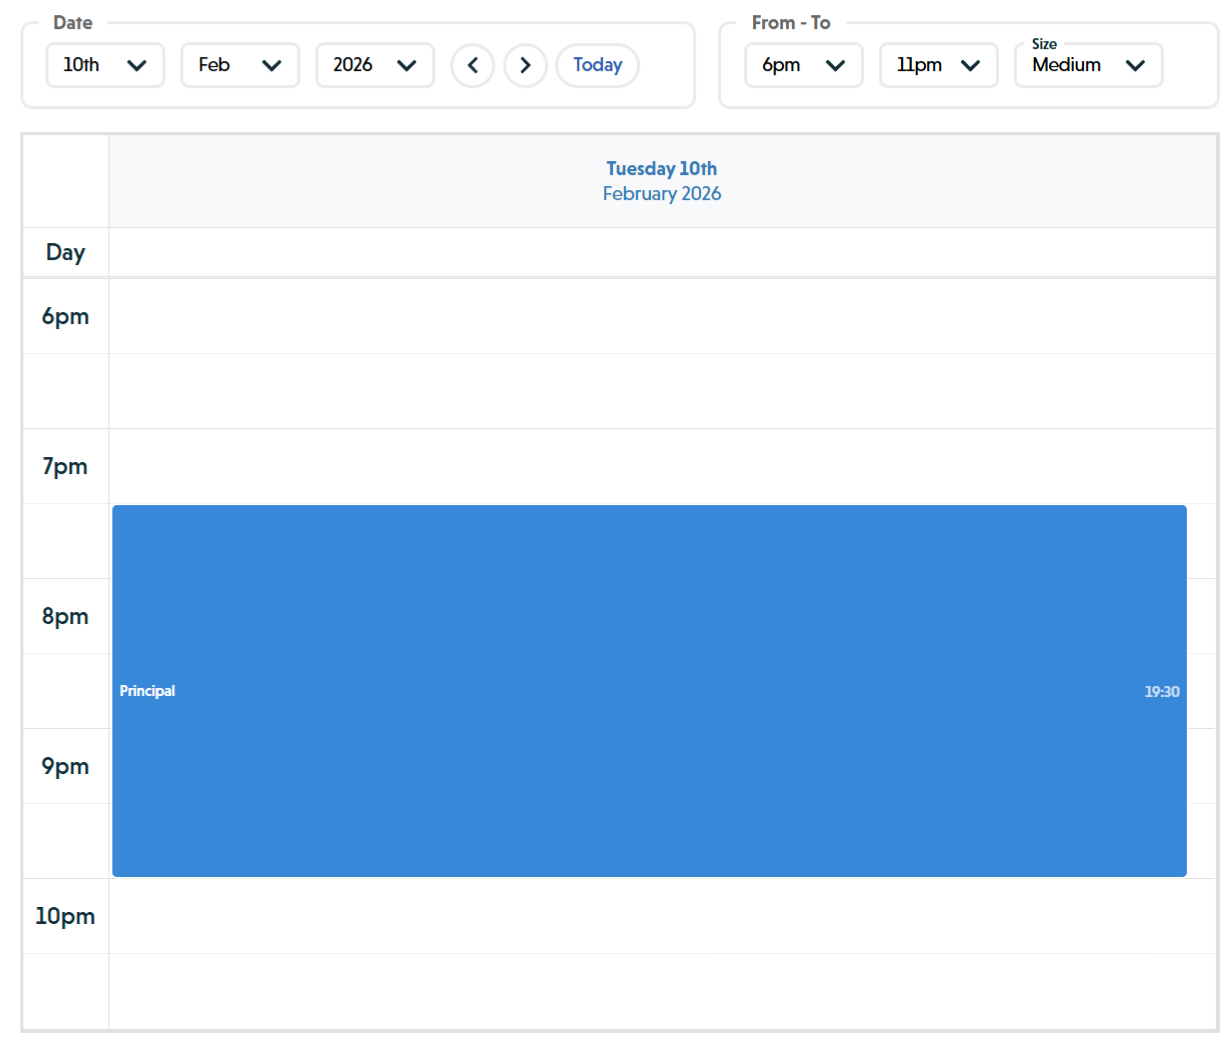
Week View
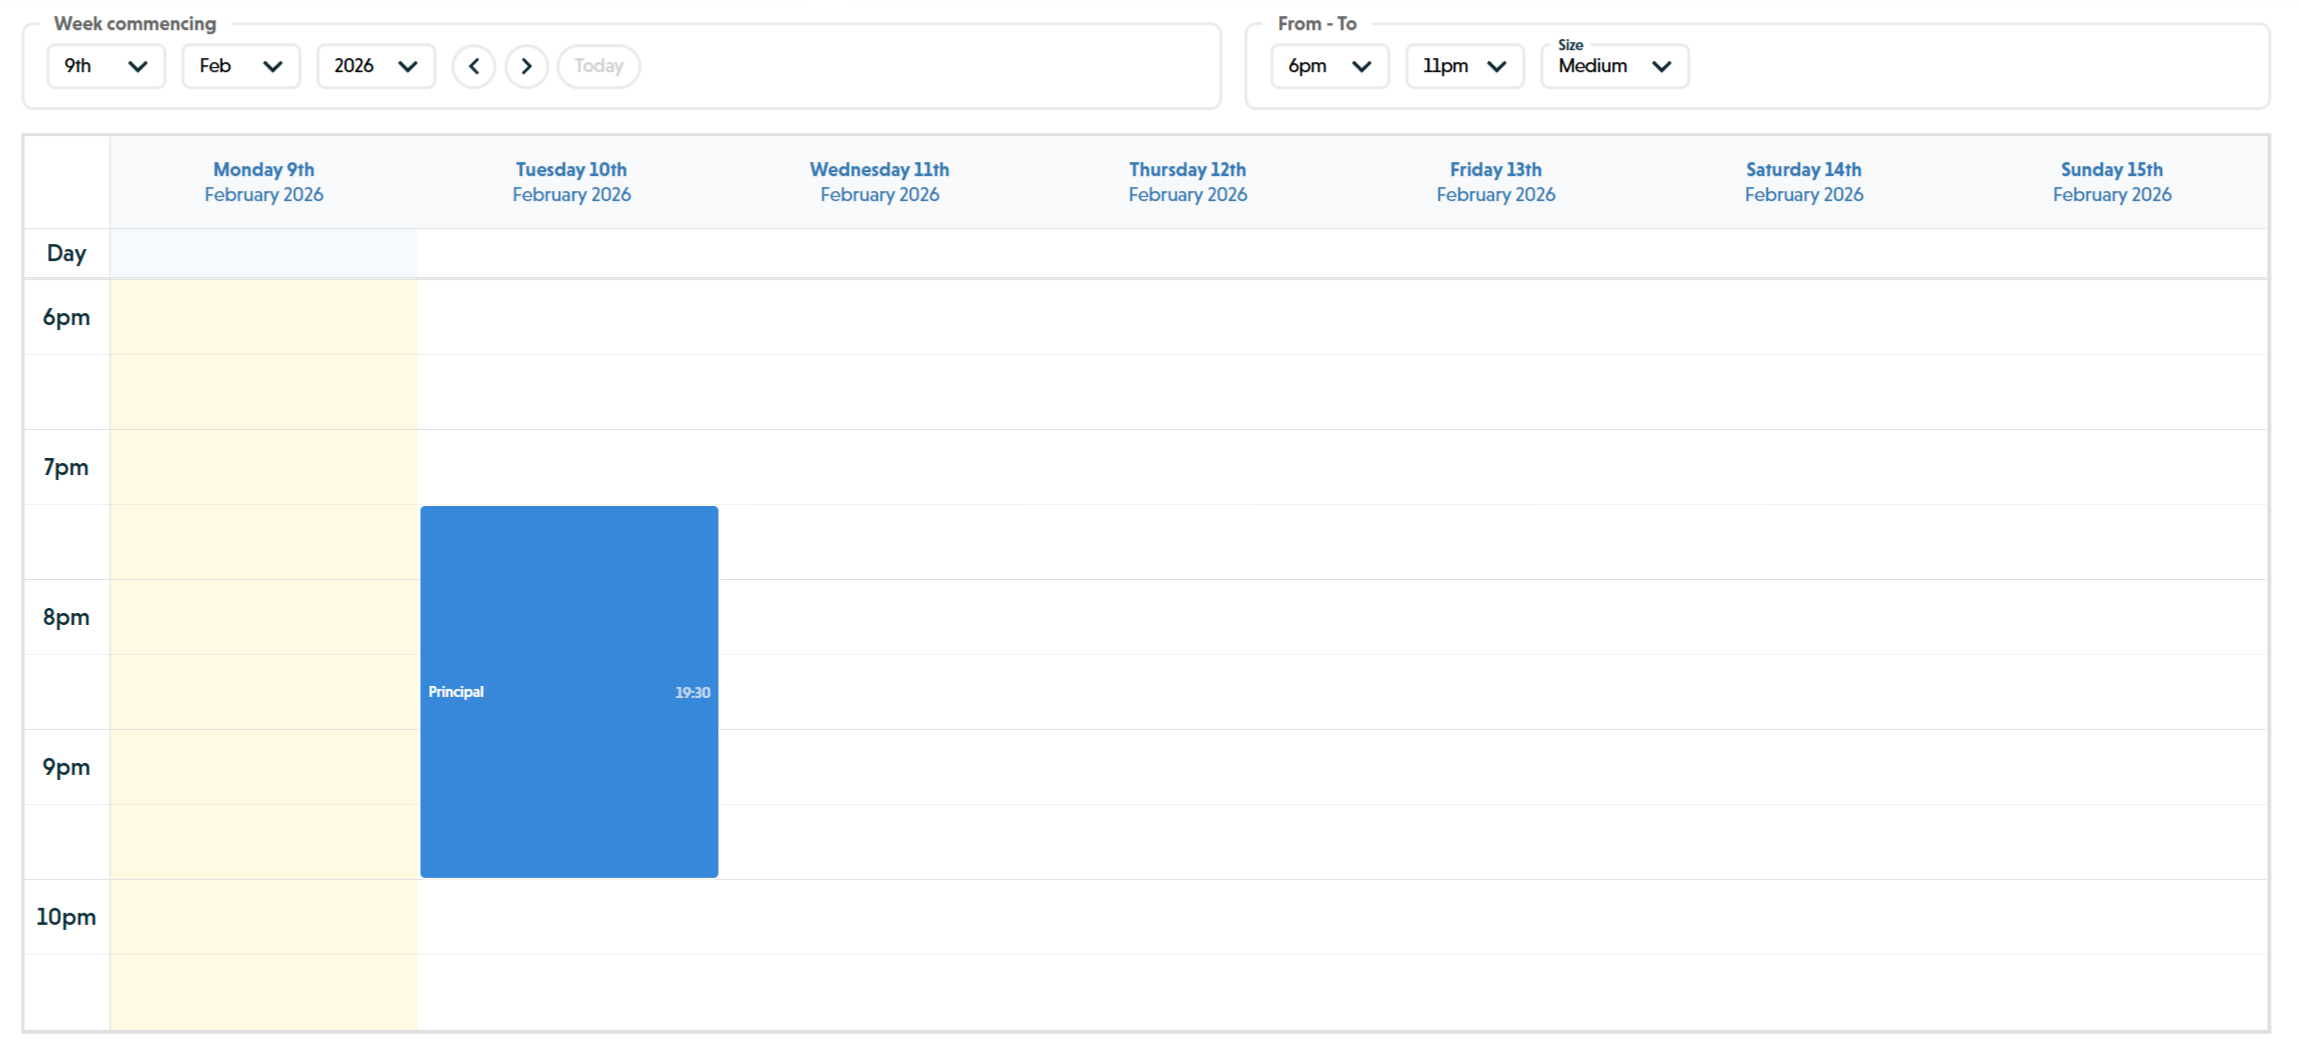 Week view showing time slots from 6pm to 11pm with a Principal rehearsal on Tuesday evening
When to use: Scheduling specific time slots and avoiding conflicts.
Shows one week with time slots from 6:00am to 11:00pm in 30-minute increments. Displays:
- Each day as a column with full date information
- Events positioned at their exact times with duration bars
- All-day events in a separate row at the top
Clicking a time slot on the calendar shows an "Add" button at that exact time, pre-filling the start time for quick item creation.
Day View
 Day view showing a single day with time slots and a Principal rehearsal event block
When to use: Managing a complex day with many scheduled activities.
Single-day view with time slots from 6:00am to 11:00pm in 30-minute increments. Similar to week view but focused on a single day. Useful for intensive rehearsal days or event days with multiple activities.
All views except Event view include standard navigation controls (previous, next, today). Your selected view mode is saved in your browser and restored when you return.
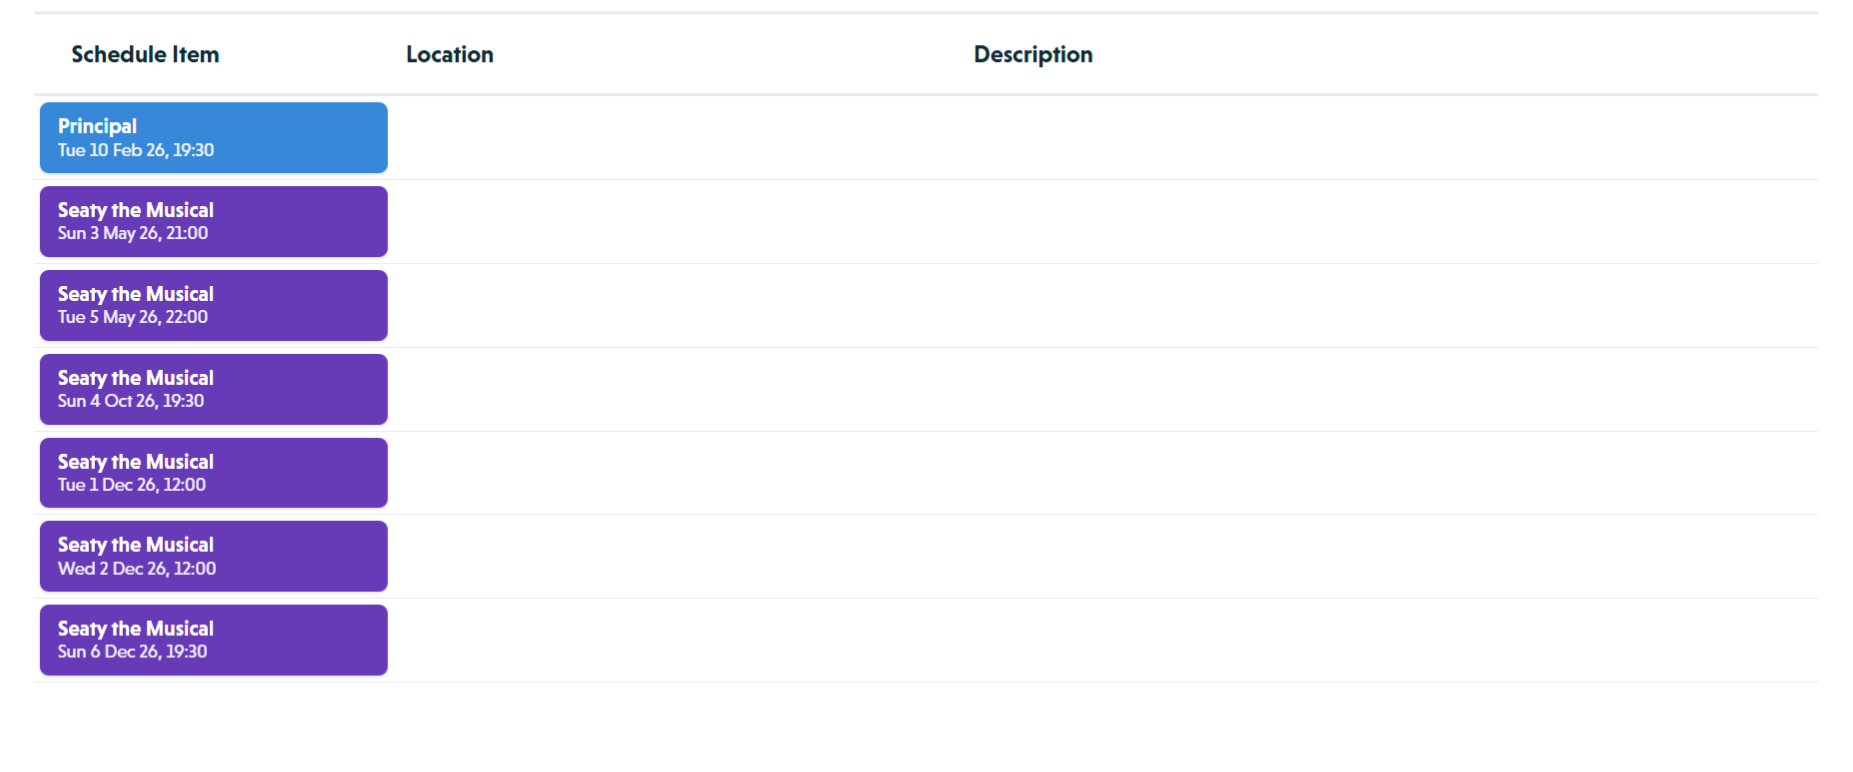 List view showing all schedule items in a table with columns for title, location, and description
Filtering Schedule Items
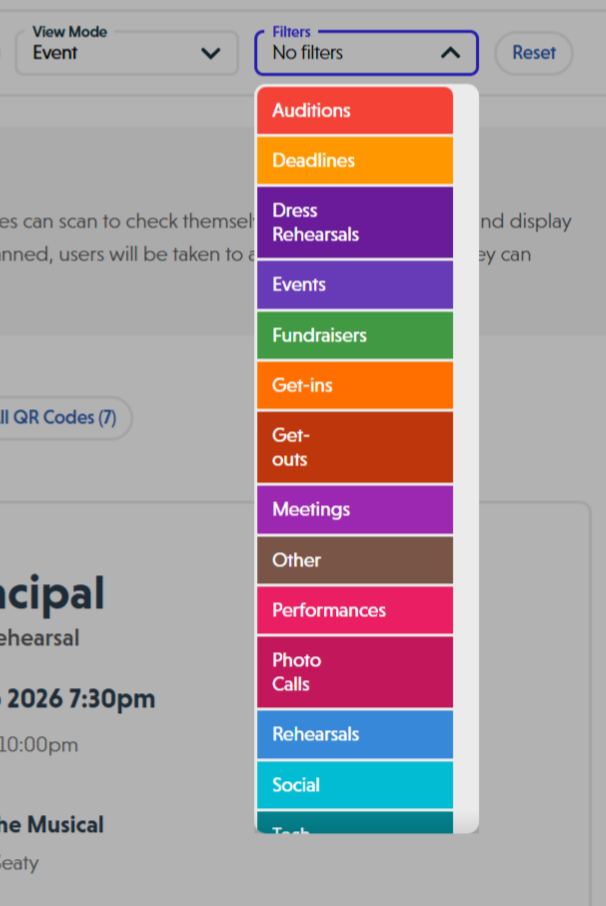 Filters dropdown showing colour-coded type options for filtering schedule items
Use the filter dropdown to focus on specific types of activities or reduce visual clutter.
Type Filter Dropdown:
The "Filters" dropdown is a multi-select control that allows you to filter by schedule item types:
- Click the dropdown to see all available types: Rehearsals, Meetings, Auditions, Fundraisers, Deadlines, Social, Other, Events
- Select one or more types to filter the calendar
- The dropdown displays custom text based on your selection:
- "No filters" - Nothing selected (all items hidden)
- "Showing all types" - All types selected (everything visible)
- "Filtering by [Type]" - Single type selected (e.g., "Filtering by Rehearsals")
- "Filtering by X types" - Multiple types selected (e.g., "Filtering by 3 types")
- Event Dates can be shown/hidden by selecting or deselecting "Events"
Filters remain active when switching between calendar views or between the Calendar and Attendance tabs. Your filter selections are saved in your browser and restored when you return.
Cancelled Items:
Cancelled items remain visible in all views with a "CANCELLED" badge. They cannot be hidden via filters.
Visibility Levels:
Organisation members only see items marked "Admin and Members". Administrators see all items regardless of visibility setting.
Attendance Tracking for Scheduled Activities
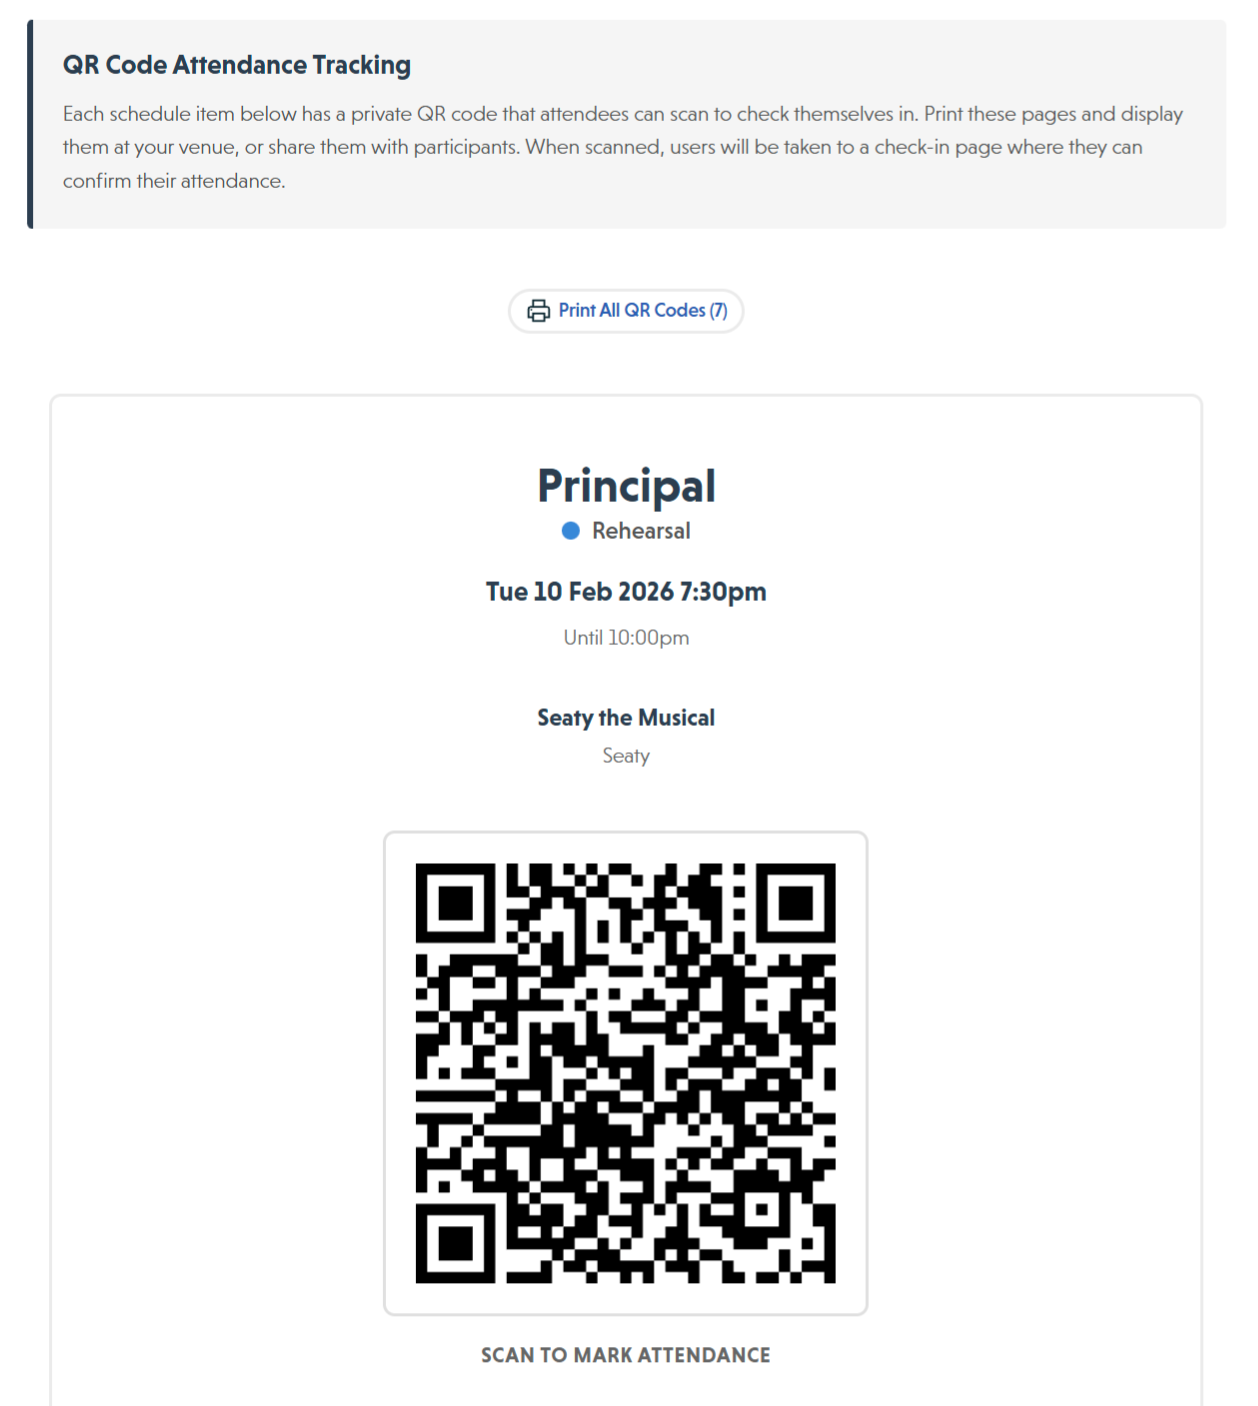 QR code attendance tracking page showing a scannable QR code for a schedule item
Every schedule item can track attendance through QR code check-ins and direct check-in links. This allows you to record who participated in each activity, when they arrived, and how long they stayed.
How Attendance Works
When you create a schedule item, the system automatically generates:
- QR Code: A unique QR code for check-in at the venue
- Check-in Link: A direct URL for checking in without scanning
Admins control whether to share these with participants. On the day of the activity, participants can:
- Scan the QR code using the Seaty mobile app
- Open the check-in link directly in a browser
- Sign in if they're not already authenticated
- Check in with a single action
The system records:
- Who checked in (organisation member or guest)
- Check-in timestamp
- Check-in method (QR code, link, or admin-initiated)
- Check-out timestamp (when they leave or session ends)
- Duration of attendance
- Any notes or role information (for guests)
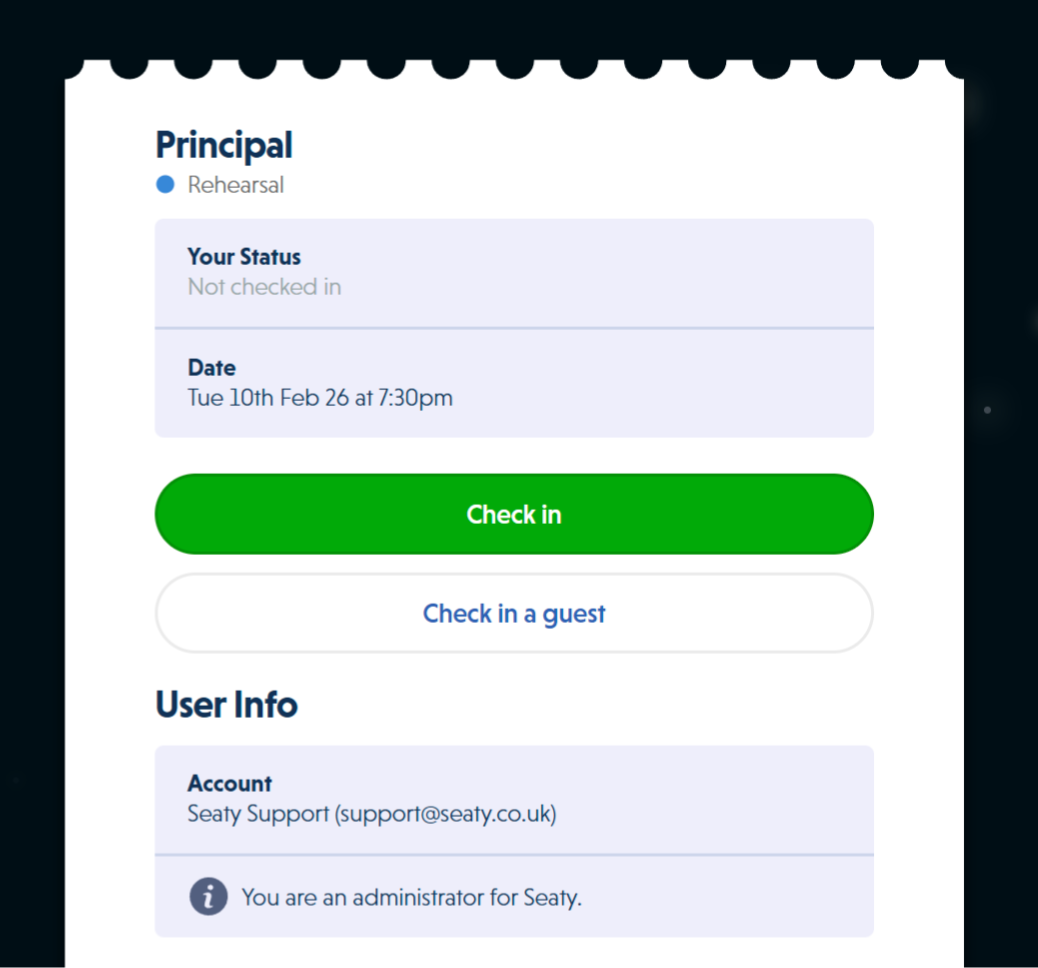 Check-in page showing attendance status, check-in button, and user information
Check-In Features
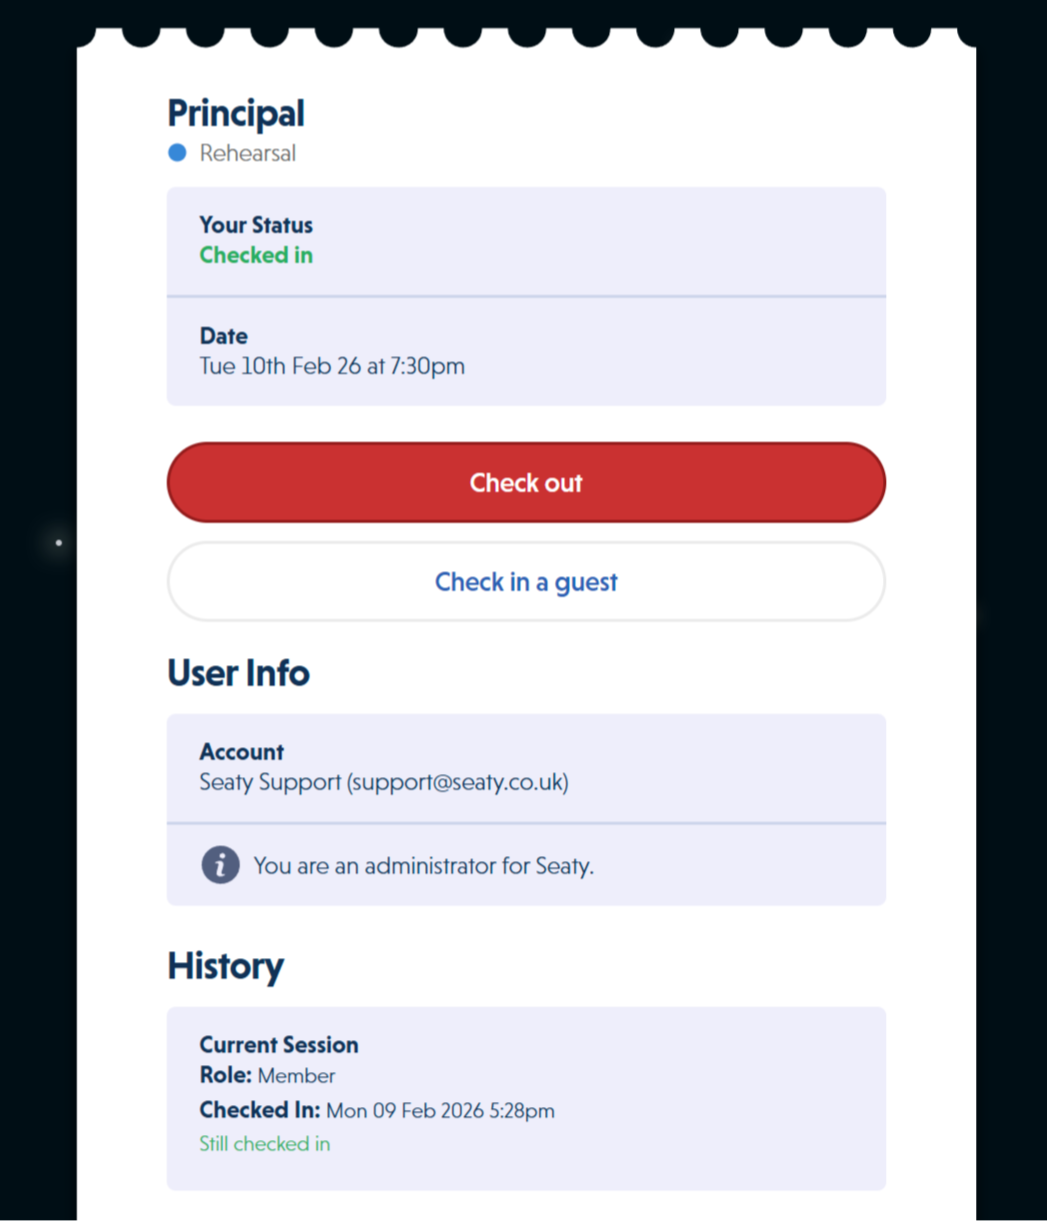 Checked in state showing green status, check-out button, and session history with timestamps
Organisation Members:
- Check in using QR code or direct link
- Automatic user identification from authenticated session
- Can check in guests on their behalf
- Multiple check-in/check-out sessions supported (useful for breaks)
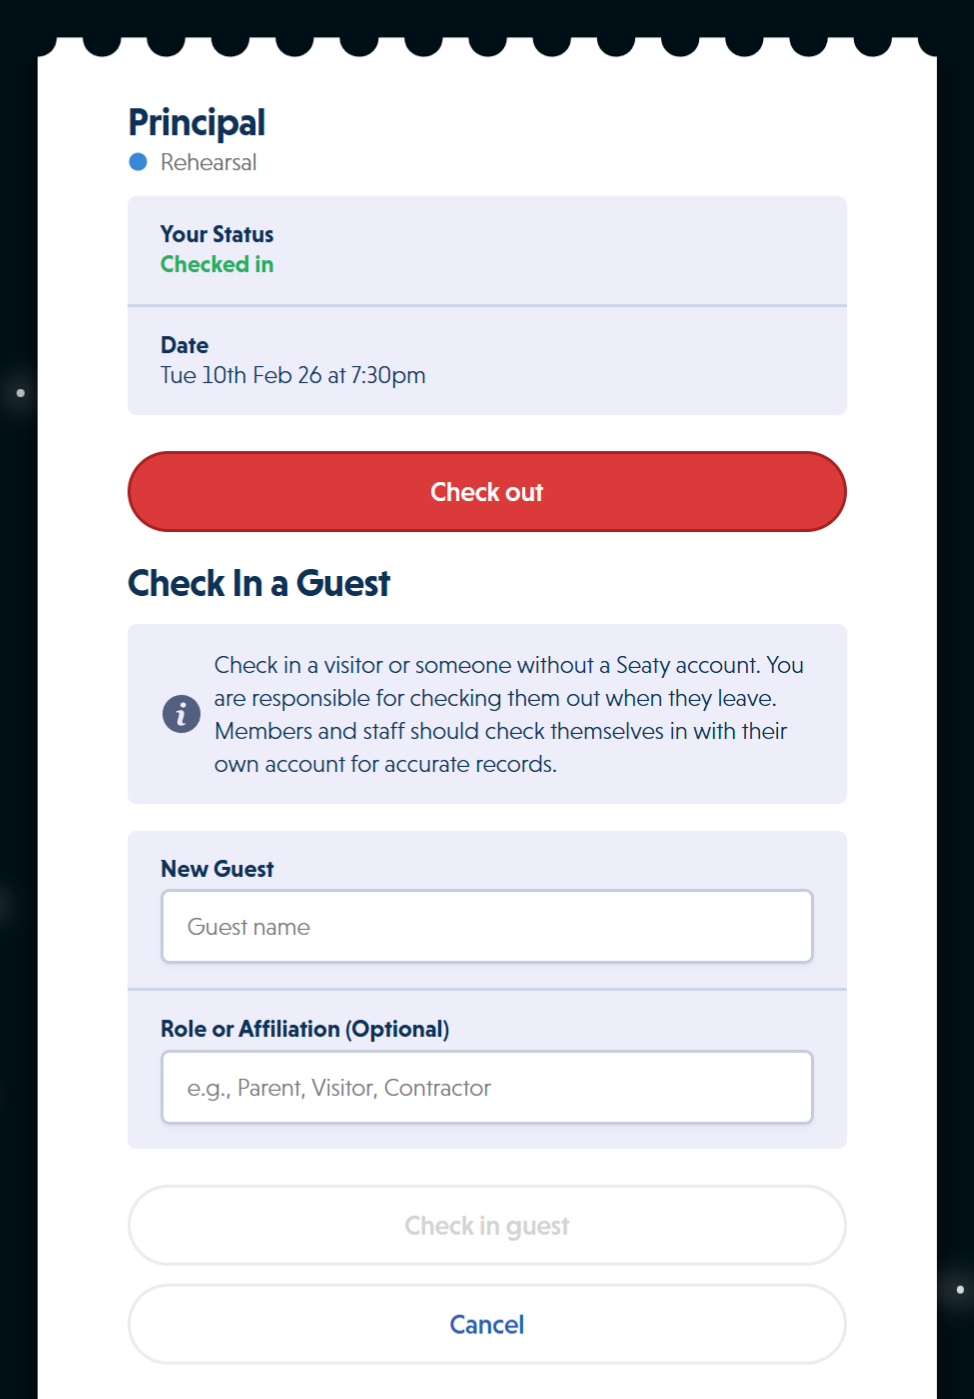 Guest check-in form showing name field, role or affiliation field, and explanatory text
Guests and Non-Members:
- Check in as a guest by providing name and role
- No account required
- Tracked separately from organisation members
Admin Controls:
- View attendance in real-time during activities
- Manually check in or check out members
- Add notes to attendance records
- Void attendance sessions if recorded in error
- View complete attendance history per member
Accidental Check-Out Protection
The system protects against accidental early check-outs. If someone checks out very quickly after checking in, they receive a warning before confirming. This prevents mistakes like accidentally tapping the check-out button.
Voided Sessions
Admins can void attendance sessions that were recorded in error or by mistake. Voiding a session:
- Automatically checks out the session if still active
- Marks the session as voided (cannot be undone)
- Records who voided the session and when
- Removes the session from attendance statistics and reports
- Still displays the session in admin attendance history for auditing
Voided sessions appear with a "VOIDED" badge and show audit information (timestamp and admin name).
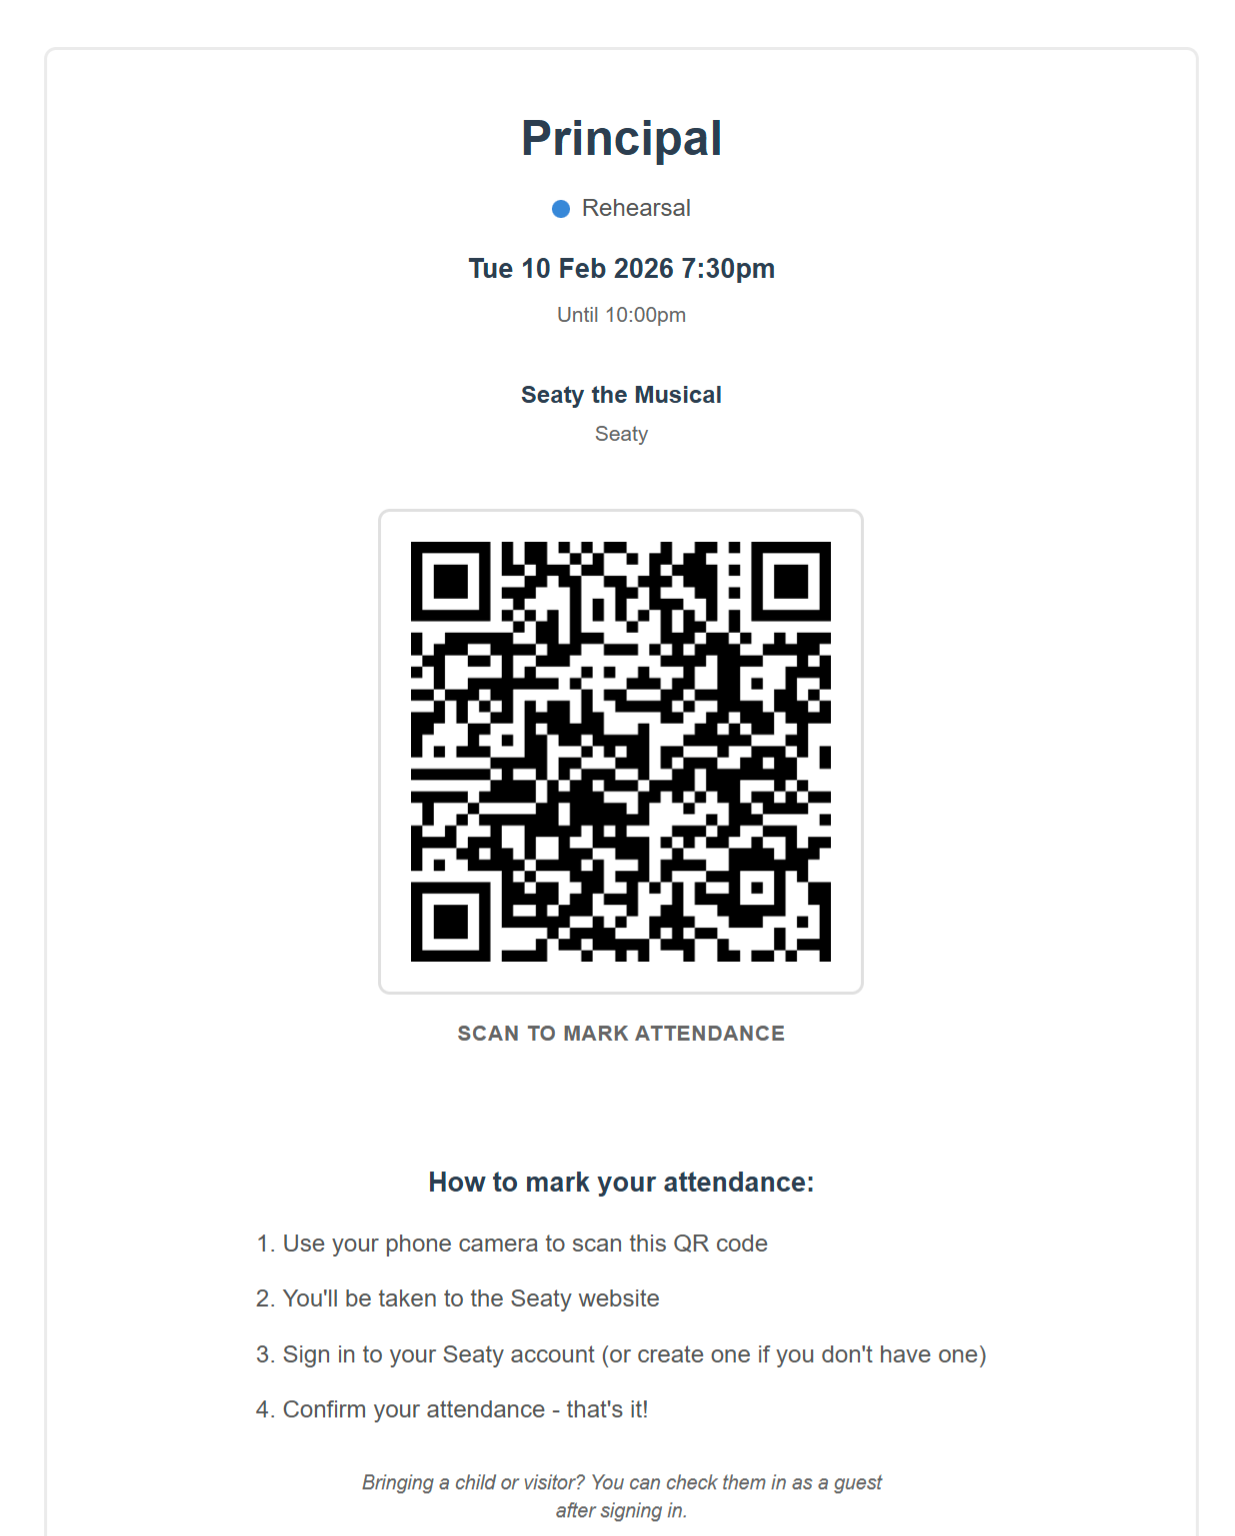 QR code page for a schedule item showing scannable code and attendance instructions
Quick Access from Schedule
When viewing a schedule item's details on the calendar:
- Click "View attendance" to see who has checked in and detailed session history
- Click "View QR code" to display the QR code for printing or sharing
These controls provide quick access to attendance features without leaving the schedule view.
Viewing Attendance (Attendance Tab)
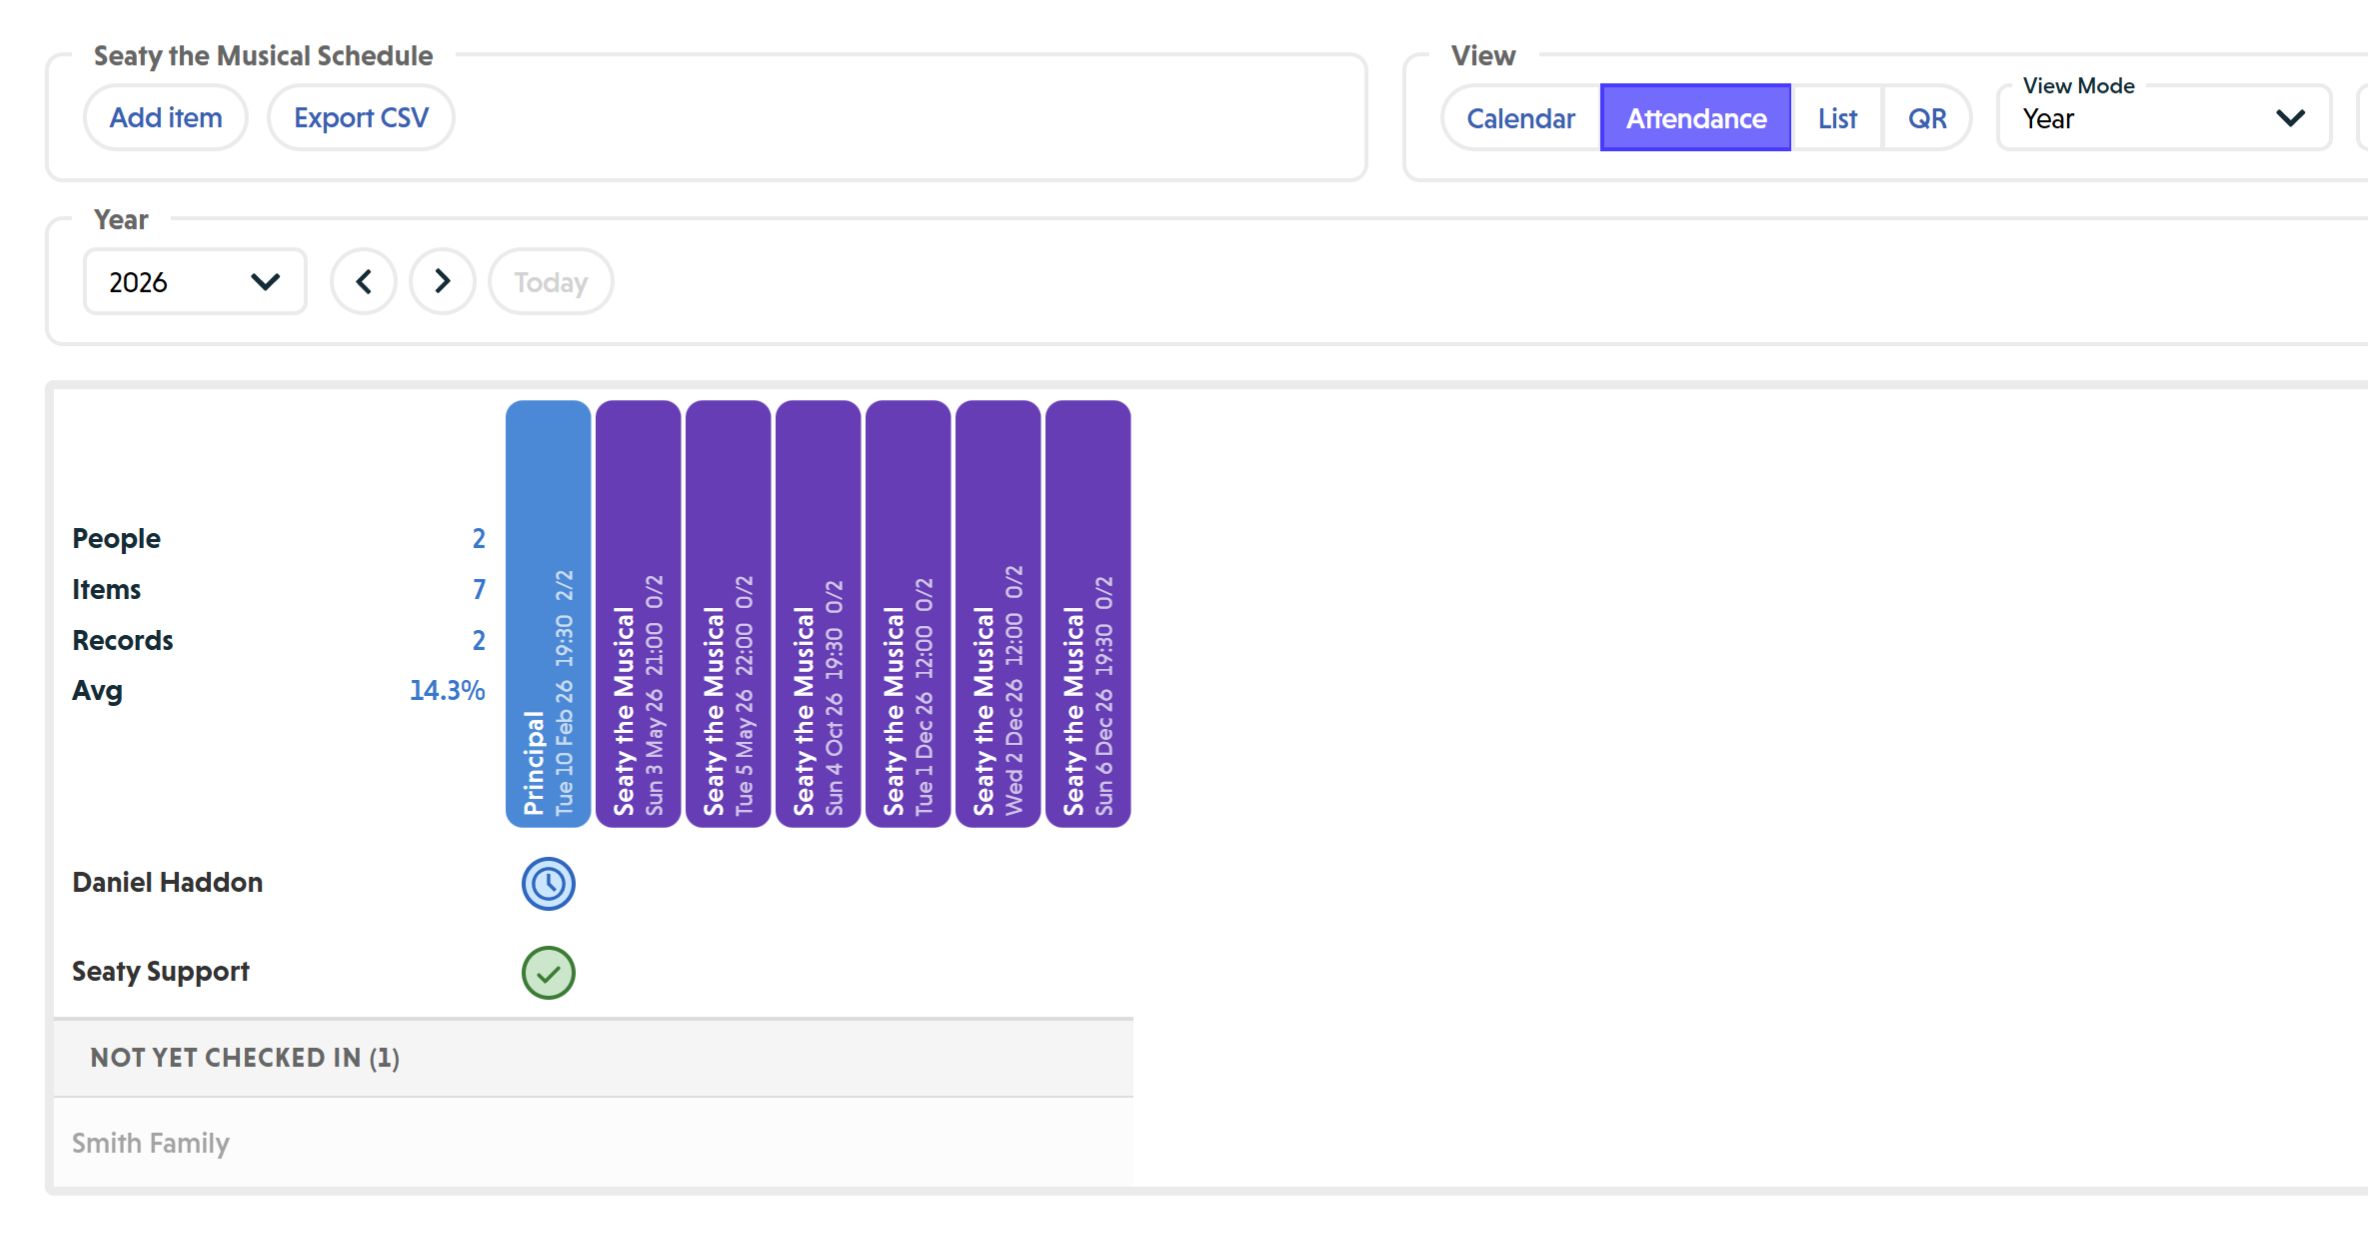 Attendance tab showing the attendance matrix with schedule items as columns and members as rows
In addition to the calendar view, the schedule page has an Attendance tab that displays attendance data in a matrix format.
Switching Between Calendar and Attendance
At the top of the schedule page, you'll see two segmented buttons:
- Calendar - Shows the traditional calendar view for creating and managing schedule items
- Attendance - Shows the attendance matrix for reviewing who attended which activities
Your selected tab is saved in your browser preferences.
Understanding the Attendance Matrix
The attendance matrix is a table showing:
- Rows: Organisation members (sorted alphabetically by first name, then last name)
- Columns: Schedule items within your selected date range (sorted chronologically)
- Cells: Attendance records for each member at each schedule item
What the matrix shows:
- Each cell represents whether a specific member attended a specific schedule item
- Column headers show:
- Schedule item title (rotated vertically for space)
- Item type colour coding
- Date and time (e.g., "Wed 15 Jan 25" and "19:00")
- Attendance statistics for that item (e.g., "8/12" means 8 attended out of 12 required)
- Row headers show:
- Member name
- Guest badge (if applicable)
- Member's attendance statistics (e.g., "10/15 67%" means attended 10 of 15 items, 67% attendance rate)
Summary statistics (top-left corner):
- People: Total number of members in the matrix
- Items: Total number of schedule items
- Records: Total attendance records
- Avg: Average attendance percentage across all members
Interactive Features
Hovering:
When you hover over any cell, row header, or column header:
- The entire row highlights (showing that member's attendance across all items)
- The entire column highlights (showing all members' attendance at that item)
- This makes it easy to scan horizontally or vertically
Clicking cells:
Click any cell to open the attendance modal for that member and schedule item, where you can:
- View detailed attendance history
- Check in or check out the member (if you're an admin)
- See session times and durations
- Void sessions if recorded in error
Clicking column headers:
Click a schedule item column header to open the full details for that schedule item.
Not Yet Checked In Section
At the bottom of the matrix, you'll see a separator row labeled "Not Yet Checked In (X)" where X is the count of members who haven't attended any items in the current date range.
These members are displayed with:
- Reduced opacity (60%) to visually distinguish them
- Subtle background colour
- Empty cells (no attendance records)
- Ability to click cells to check them in
This section only appears for administrators and helps you identify which organisation members haven't participated yet.
Date Range and Filters
The attendance matrix respects all your calendar settings:
- View mode: The matrix shows items within the date range of your selected calendar view (Day, Week, Month, Year, Custom, or Event)
- Type filters: Only items matching your selected types appear as columns
- Custom date range: When using Custom view, specify exactly which months to include
Change these settings in the "View" section at the top of the page, and the matrix updates automatically.
Exporting Attendance Data
Click the "Export CSV" button (appears when on Attendance tab) to download a spreadsheet with:
Columns:
- Member Name
- One column per schedule item showing "Type DD/MM/YYYY HH:MM"
Cell values:
- ✓ - Member attended (single session)
- ✓ (2) - Member attended with multiple check-in/check-out sessions
- G - Guest attended
- R (Required - Absent) - Member was required but did not attend
- (blank) - Member was not required and did not attend
Filename: attendance-report-YYYY-MM-DD-HHmmss.csv
The Export CSV button is only enabled when there is attendance data to export.
Editing Schedule Items
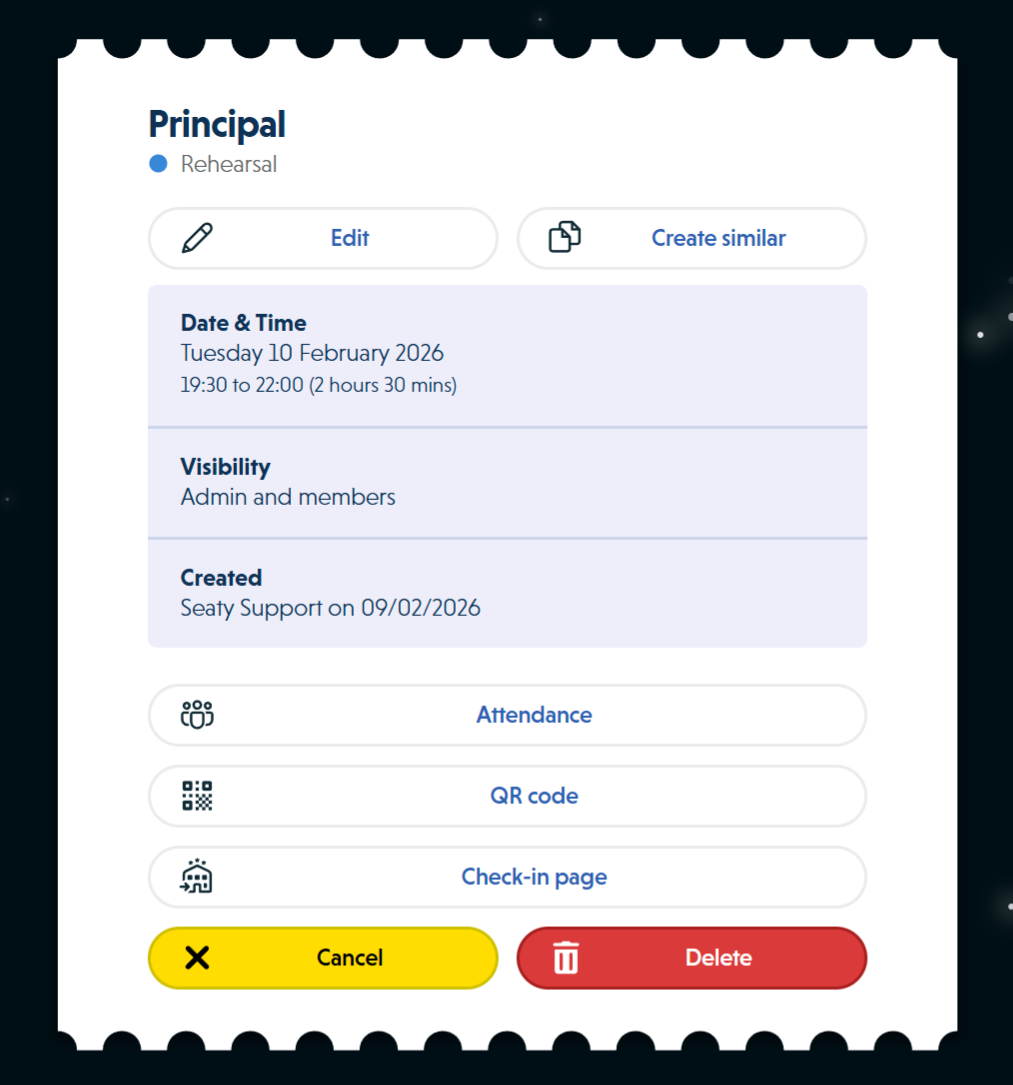 Schedule item detail modal showing title, type, date, visibility, and action buttons
Click any schedule item on the calendar to open its details. The modal shows all information including type, date/time, location, description, and visibility level.
Editing Single Items
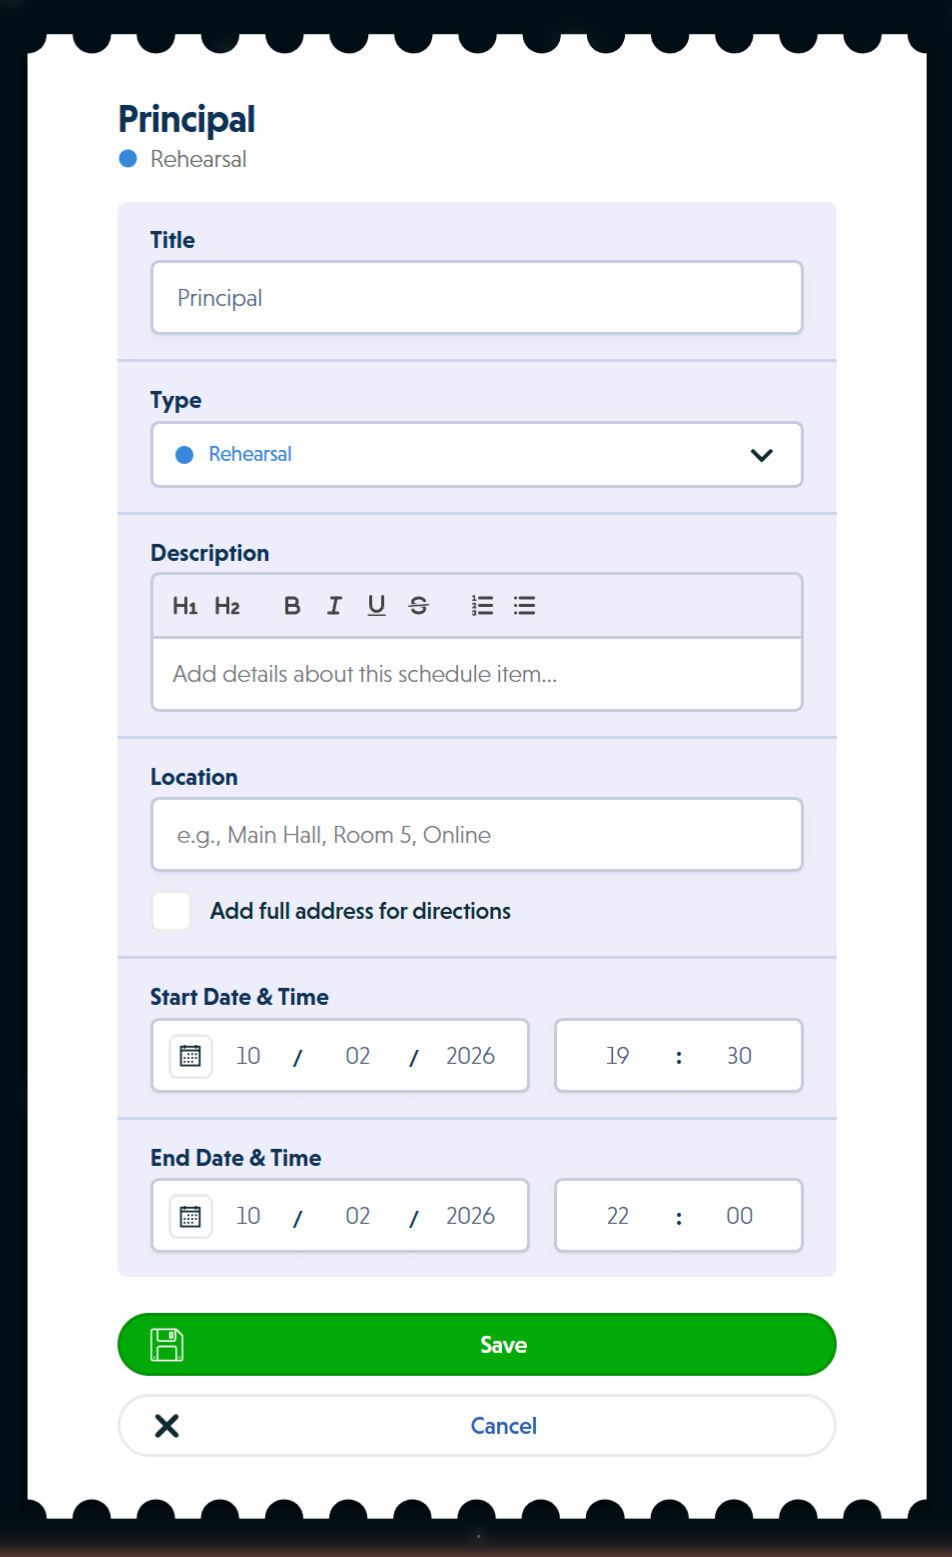 Edit form for a schedule item showing title, type, description, location, and date/time fields
To modify a schedule item:
- Click "Edit" in the item modal
- Change any of the following:
- Title
- Type (Rehearsal, Meeting, etc.)
- Location and address
- Description
- Start and end date/time
- Visibility level
- Click "Save"
For items that are part of a recurring series:
You'll see three save options (explained in the next section). Choose "Save this event only" to edit just this one occurrence without affecting other items in the series. This breaks the item away from the series, making it independent.
Validation rules when editing:
- Title cannot be empty
- For timed events: end time must be after start time
- Events must be at least 5 minutes long
- If the event is longer than 24 hours, you'll be asked to confirm this is intentional
Editing Recurring Series
When you edit an item that belongs to a recurring series (created with the recurring pattern), you have three save options:
Save this event only
- Changes apply only to the item you clicked on
- This item becomes independent from the series
- Other items in the series remain unchanged
- Use this for one-off changes (e.g., "This Tuesday's rehearsal moved to a different room")
Save this and all future events
- Changes apply to this item and all items in the series that occur on or after this date
- Creates a new independent series for future items
- Past items remain in the original series unchanged
- Shows the count of items that will be affected
- Use this when something changes going forward (e.g., "Rehearsals from next week onwards now at 8pm instead of 7pm")
Save to entire series
- Changes apply to every item in the series (past and future)
- Shows the total count of items in the series
- Use this for universal changes (e.g., "All rehearsals now at the community centre instead of the school")
The modal displays helpful counts so you know exactly how many items will be affected before confirming.
The Offset System for Series Edits
When editing date/time for recurring series items, the system uses an offset system to apply changes proportionally:
How it works:
If you change the start time or duration of one item in a series, the system calculates the difference and applies that same difference to all items in the scope (series or future).
Example: Your Monday rehearsals are at 7:00pm for 2 hours. You edit one item to start at 7:30pm (30 minutes later) and last 2.5 hours (30 minutes longer).
- If you "Save to entire series": All items shift 30 minutes later and become 30 minutes longer
- If you "Save this and all future events": Only future items shift 30 minutes later and become 30 minutes longer
The modal shows you a warning with the exact offset before applying:
- "Start time: +30 minutes later"
- "Duration: +30 minutes longer"
This prevents accidentally setting every rehearsal to the exact same date/time, which would create overlapping items.
When to orphan an item:
If you want to change just one item to a completely different time (not just shifting), use "Save this event only". This breaks it from the series and lets you set any time you want without affecting others.
Cancelling and Restoring Items
Cancelling vs Deleting
Cancelling and deleting are different:
- Cancel: Marks the item as cancelled but keeps it visible with a "CANCELLED" badge. Can be restored later. Useful when a rehearsal is cancelled but you want to keep record of it.
- Delete: Permanently removes the item from the database. Cannot be undone. Use when the item was created by mistake.
Cancelling Single Items
To cancel a schedule item:
- Click the item on the calendar
- Click "Cancel this event"
- Confirm the action
The item remains visible on the calendar with a "CANCELLED" badge in red. All other information (title, type, time, location) remains visible.
Cancelling Recurring Series
When cancelling an item that's part of a recurring series, you have three scope options:
Cancel this event only
- Only this occurrence is marked as cancelled
- Remaining items in the series stay active
- Confirmation shows how many items remain in the series
Cancel this and all future active events
- This item and all future items in the series are marked as cancelled
- Already-cancelled items are not affected
- Shows the count of active items that will be cancelled
- Past items before this date remain active
- Only appears if there are future active items
Cancel entire series
- All items in the series (past and future) are marked as cancelled
- Already-cancelled items remain cancelled
- Shows the count of active items that will be cancelled
- Only appears if there are active items in the series
The system only shows options that apply. If all future items are already cancelled, you won't see "Cancel this and all future active events".
Restoring Cancelled Items
To restore a cancelled item:
- Click the cancelled item (look for the "CANCELLED" badge)
- Click "Restore this event"
- Confirm the action
The item returns to its normal state and the "CANCELLED" badge is removed.
Restoring items in a recurring series:
Similar to cancelling, you have three scope options when restoring:
Restore this event only
- Only this occurrence is restored
- Other cancelled items remain cancelled
Restore this and all future cancelled events
- This item and all future cancelled items in the series are restored
- Shows the count of cancelled items that will be restored
- Only appears if there are future cancelled items
Restore entire series
- All cancelled items in the series are restored
- Shows the count of cancelled items
- Only appears if there are cancelled items in the series
Already-active items are never affected by restore operations. The system only restores items that are currently cancelled.
Deleting Schedule Items
Deletion is permanent and cannot be undone. Deleted items are completely removed from the database.
When to delete instead of cancel:
- The item was created by mistake
- The item should not appear in any historical records
- You're cleaning up test data
When to cancel instead of delete:
- The activity was planned but didn't happen
- You want to keep a record of cancelled rehearsals
- You might restore it later
Deleting Single Items
To permanently delete a schedule item:
- Click the item on the calendar
- Click "Delete"
- Choose "Delete this event"
- Confirm the action
The item is immediately and permanently removed. There is no undo.
Deleting Recurring Series
When deleting an item from a recurring series, you have three scope options:
Delete this event only
- Only this occurrence is deleted
- Shows how many items remain in the series
- Other items continue to exist
Delete this and all future events
- This item and all future items in the series are deleted
- Shows the count of items that will be deleted
- Past items remain in the database
- Useful for ending a recurring pattern early
Delete entire series
- All items in the series are permanently deleted
- Shows the total count of items in the series
- Removes all evidence of the recurring pattern
- Cannot be undone
Each option shows a confirmation dialog with the count of items that will be affected. Review carefully before confirming.
Drag-to-Edit Mode
Administrators can enable drag-to-edit mode to quickly reschedule items by dragging them on the calendar.
Enabling drag-to-edit:
On the Calendar tab, you'll see a switch labeled:
- "Drag to edit enabled" - Mode is active
- "Drag to edit disabled" - Mode is inactive
Toggle this switch to turn the feature on or off. Your preference is saved.
How it works:
When enabled, you can:
- Drag items to new times: Click and hold a schedule item, then drag it to a different time slot (Week/Day views)
- Drag items to new dates: Drag items to different days (Month view)
- Resize items: Drag the top or bottom edge of an item to change its duration (Week/Day views)
Changes take effect immediately. For items in a recurring series, you'll be asked whether to apply the change to:
- This event only
- This and all future events
- Entire series
When to use drag-to-edit:
- Quick adjustments to rehearsal times
- Moving items to avoid conflicts
- Extending or shortening item durations
When not to use drag-to-edit:
- Changing complex details (use the Edit modal instead)
- Making changes to multiple items at once
- Changes requiring detailed notes or explanations
Turn off drag-to-edit when you don't want to accidentally move items while navigating the calendar.
Schedule Preferences
Your schedule viewing preferences are automatically saved in your browser and restored when you return.
Saved preferences include:
- View mode: Which calendar view you last used (Event, Year, Custom, Month, Week, Day)
- Current tab: Whether you were on Calendar or Attendance tab
- Current date: What date you were viewing (so the calendar returns to the same position)
- Custom date range: Your selected start and end months/years (when using Custom view)
- Type filters: Which schedule types you had selected in the dropdown
- Selected events: Which events you had loaded (when viewing organisation schedule)
- Time slot settings: Your configured minimum and maximum time slots for Week/Day views
- Slot size: Your preferred slot size interval
- Drag-to-edit: Whether drag-to-edit mode was enabled
Preference storage:
Preferences are stored separately for each event. This means viewing the schedule for "Hamlet" won't affect your saved preferences for "Romeo and Juliet".
Resetting preferences:
Click the "Reset" button to:
- Return to Month view
- Navigate to today's date
- Clear all type filters
- Clear selected events (organisation view)
This is useful if your view becomes cluttered or you want to start fresh. Your saved preferences are deleted and replaced with defaults.
Preferences persist until you clear your browser data or click "Reset". They are not synced between devices or browsers.
Common Questions
Editing and Series Management
Can I change a single item to a different type without affecting the series?
Yes. Click the item, click "Edit", change the type, then choose "Save this event only". This breaks it from the series and lets you change anything about that one occurrence.
How do I change the duration of all items in a series?
Edit one item, change the end time, then choose "Save to entire series". The system calculates the duration difference and applies it to all items.
What happens if I delete a recurring pattern?
The pattern itself is not a separate entity. If you "Delete entire series", all items created by that pattern are deleted. The original pattern is removed. You would need to recreate it from scratch.
Can I convert a single item into a recurring series?
No. The recurring pattern must be created when the item is first created. If you need to convert a single item, you would need to:
- Note all the details of the original item
- Create a new recurring series with those details
- Delete the original single item
Visibility and Access
Can members see cancelled items?
Yes, if the item's visibility is set to "Admin and Members" and it's not deleted. The "CANCELLED" badge appears for everyone who can see the item.
Why can't I see the "Event" view?
Event view requires event dates or schedule items to calculate the span. If you have no schedule items or event dates yet, Event View defaults to showing the current month.
Attendance for Scheduled Activities
Do cancelled items still track attendance?
Yes. Cancelled items retain all functionality including attendance tracking. If a cancelled rehearsal still happened, you can record attendance.
How do I view attendance for multiple items at once?
Use the Attendance tab to see a matrix of all members and schedule items. This shows attendance patterns at a glance and allows you to export the data to CSV.
Can I export attendance data?
Yes. On the Attendance tab, click "Export CSV" to download a spreadsheet with attendance records for all visible items and members.
What does the "Not Yet Checked In" section show?
This section (visible to admins only) lists organisation members who haven't attended any schedule items in your current date range. Click their cells to check them in.
Can I void a session that was recorded by mistake?
Yes. Admins can void attendance sessions from the attendance history modal. Voided sessions are automatically checked out, removed from statistics, and marked with audit information showing who voided them and when.
Drag-to-Edit
Can I accidentally move items when drag-to-edit is on?
Yes. If you find yourself accidentally dragging items, turn off drag-to-edit mode using the switch at the top of the Calendar tab.
What happens if I drag a recurring item?
When you drag an item from a recurring series, you'll be asked whether to apply the change to just that item, that item and all future items, or the entire series.
Dates and Historical Records
Can I create schedule items for dates in the past?
Yes. The system does not enforce future dates. You can create items at any date for historical record-keeping or catching up on missed entries.
Can I use the Custom view for any date range?
Yes. Custom view allows you to select any start and end month/year combination within 5 years in the past or future from today.