Admit and Redeem: Door Entry and Merchandise Pickup
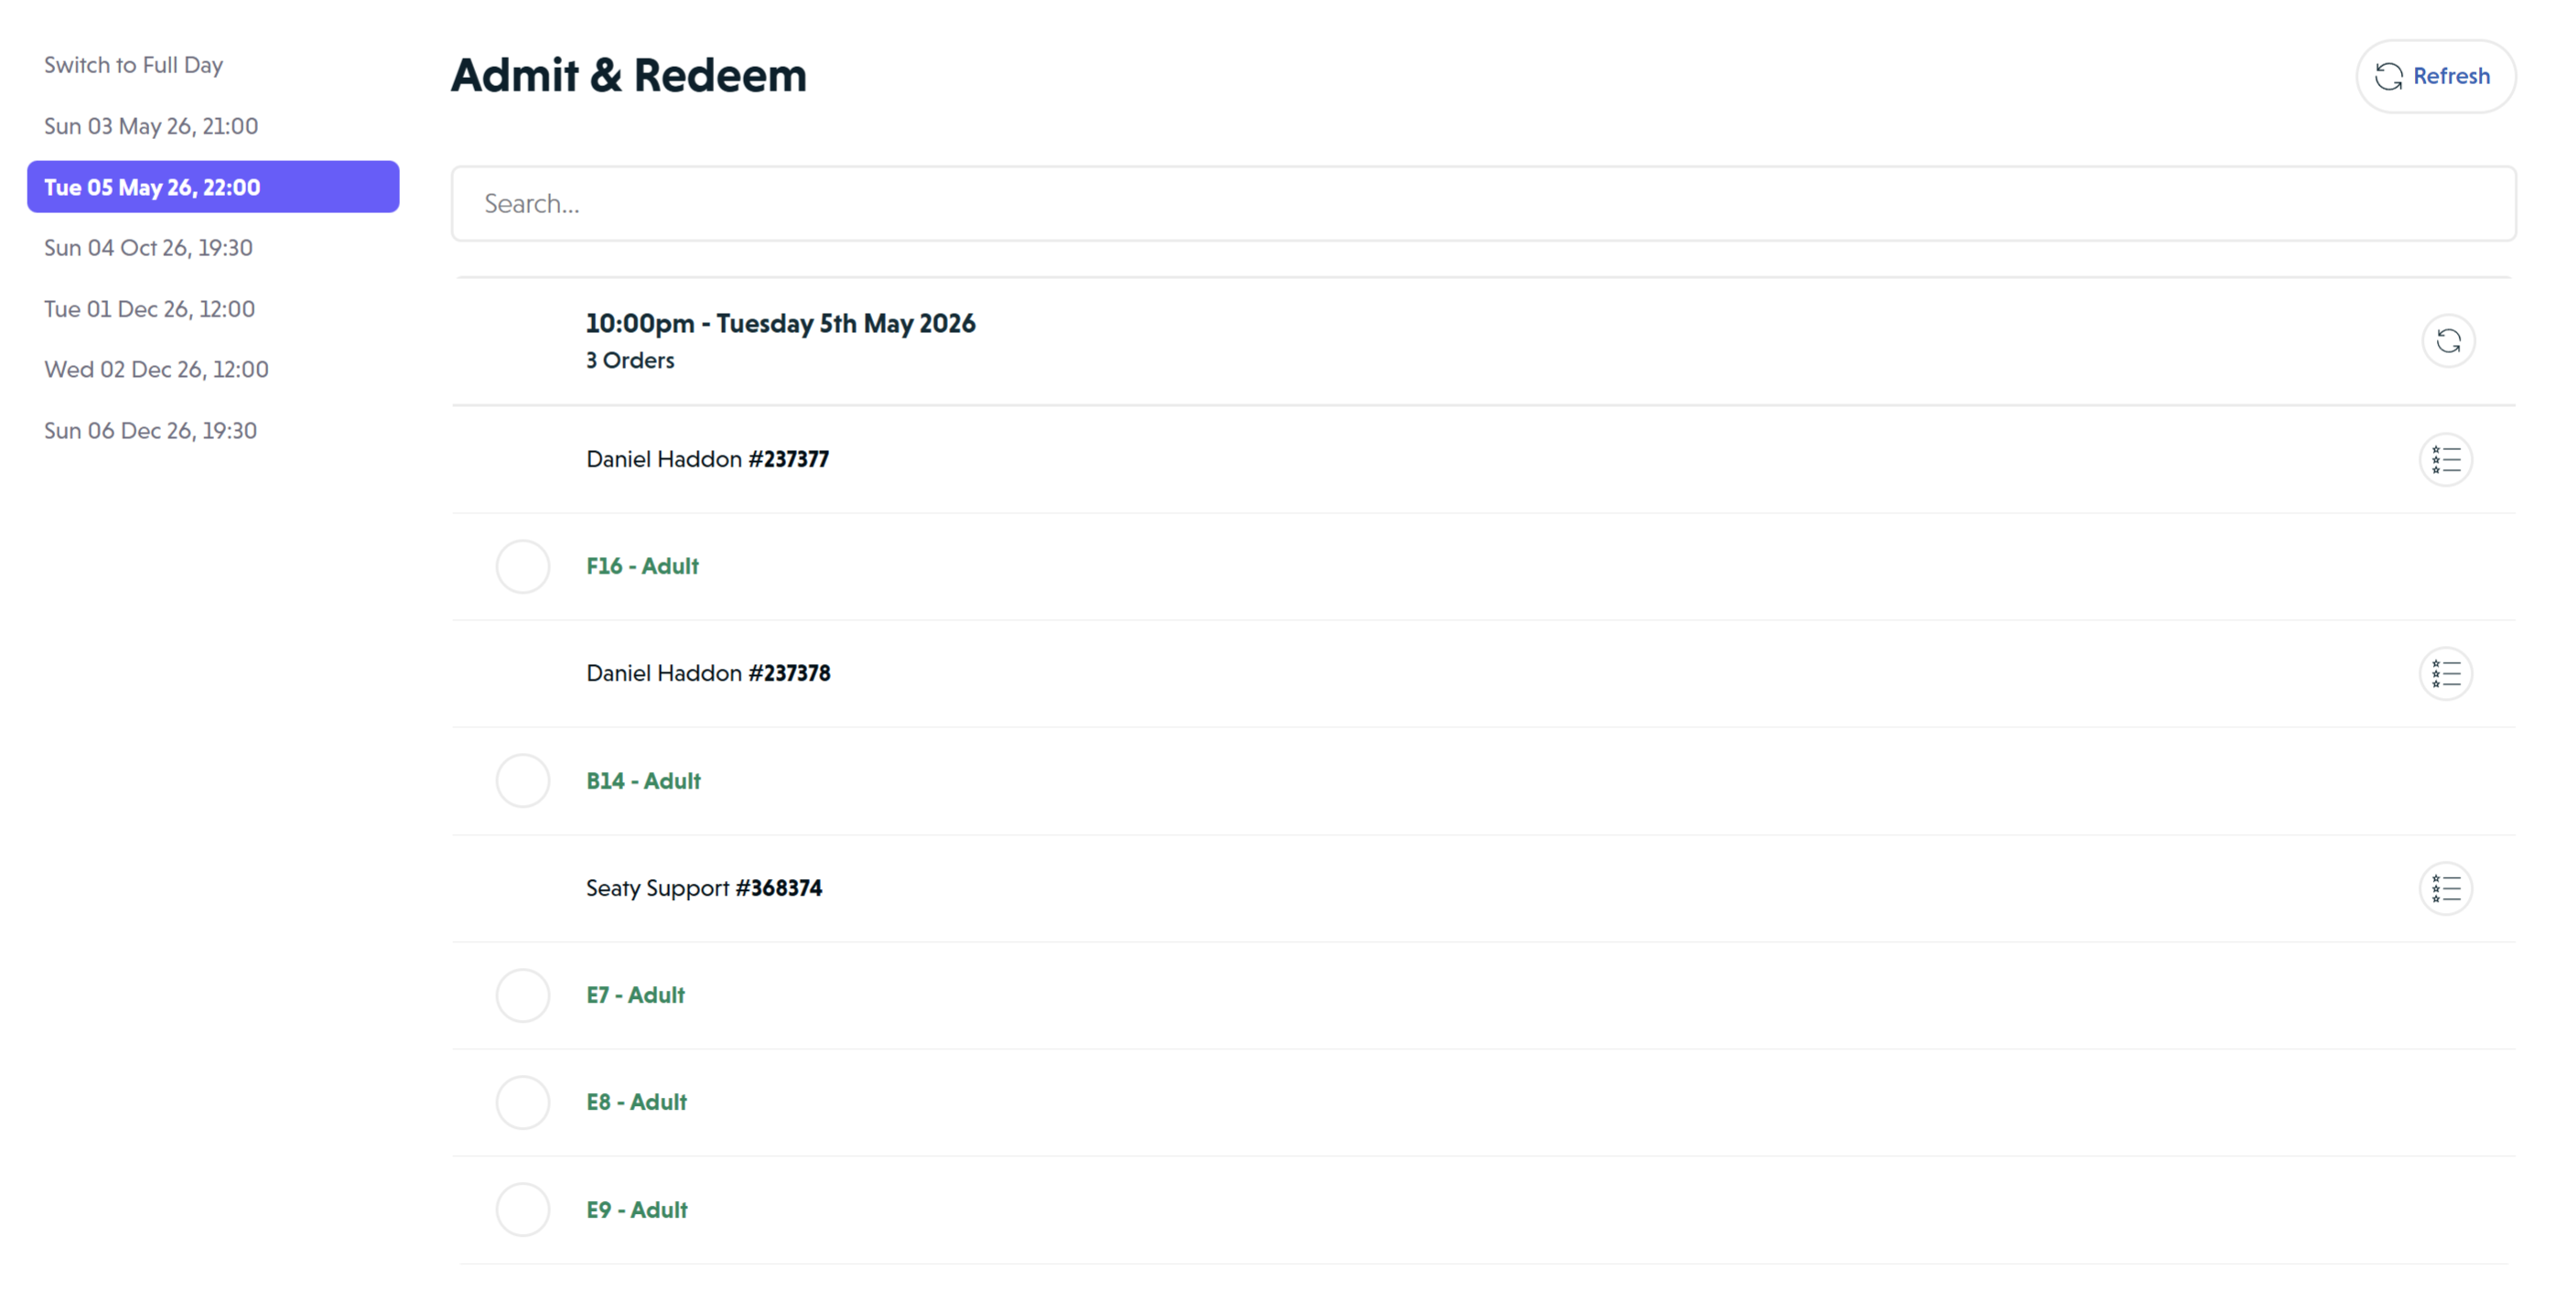 Admit and Redeem page
Overview
Admit & Redeem is a register-style system that groups all orders for an event date together, allowing you to systematically track admission and redemption status for each ticket and merchandise item. This works alongside automatic QR code scanning but provides manual control when needed.
At its simplest, Admit & Redeem answers one question: Who has arrived and what have they collected?
Who uses this: Event administrators with the Admit & redeem permission.
Key capabilities:
- Mark tickets as admitted when QR scanning is not possible
- Record when extras, vouchers, or merchandise are collected
- View all attendees in a list format for systematic checking
- Process entry for valid customers without functioning QR codes
- Continue operations if scanning devices fail
- See all tickets for an order together with attendee details
How It Works
At a glance: Select an event date, view all orders in a register format, and mark tickets or merchandise as admitted or redeemed with a single click.
1. Select your event date
From your event's admin page, open Admit & Redeem and choose either a specific event date or a full day from the side menu. The system loads all orders for your selection.
2. Find the attendee
Scroll through the register or use the search box to find orders by name, email, or order number. Orders are grouped by event time and sorted alphabetically by attendee name.
3. Mark admission or redemption
Click the check button next to each ticket or merchandise item. The button turns green with a tick mark, and a timestamp records when the action occurred.
4. Handle reversals if needed
If you mark something in error, click the green button again to reverse the action. The system records both the original action and the reversal for accountability.
Think of it this way:
- QR scanning handles the normal flow - fast, automatic admission as people arrive
- Admit & Redeem handles exceptions - lost phones, damaged tickets, merchandise collection
- Both systems update the same admission status, so you can mix and match as needed
When to Use Admit & Redeem
Use this feature instead of QR scanning when:
- Lost or Damaged Tickets: Customer's printed ticket is unavailable or QR code is unreadable
- Technical Issues: Scanning devices are not working or mobile app is unavailable
- Phone Problems: Customer cannot access digital ticket (dead battery, broken phone)
- Merchandise Collection: Tracking when extras like programmes or refreshments are picked up
- Alternative Entry Methods: Door lists, guest lists, or comp tickets without QR codes
- Deliberate Manual Process: Events that prefer register-based check-in over scanning
Difference from Scanning
Understanding how Admit & Redeem differs from the Ticket Scans system:
| Feature | QR Scanning | Admit & Redeem |
|---|---|---|
| Method | Automatic via mobile app | Manual via web dashboard |
| Use Case | Primary door entry method | Fallback and special cases |
| Speed | Instant | Manual lookup required |
| Equipment | Mobile device with camera | Any device with web browser |
| Best For | Normal operations | Exceptions and merchandise |
| Track | Scan history with device/user | Admission/redemption status |
| Viewable In | Scans section | Admit & Redeem section |
Scanning a valid ticket automatically admits it. The Admit & Redeem system shows this admission status and allows manual updates when scanning is not used.
Accessing Admit & Redeem
To view the admission register:
- Navigate to your event's admin page
- Select Admit & Redeem from the event menu
- Choose an event date or full day from the side menu
- View all orders for that date grouped by event time
Understanding the Register View
The system displays orders organised hierarchically:
Event Date Groups
Orders are grouped by event date and time, showing:
- Event time and date: e.g., "7:30pm - Friday 15th March 2025"
- Order count: Total number of orders for this event date
- Refresh button: Update admission status from other devices
Order Rows
Each order displays:
- Attendee name: Who the tickets are for
- Order number: Reference ID (e.g., #12345)
- Admin notes: Any internal notes about this order (if present)
- Order button: Quick access to full order details
Ticket/Item Rows
Each ticket or merchandise item shows:
- Check button: Green tick when admitted/redeemed, grey when not
- Seat/item details: Seat location (for tickets) or item name
- Ticket category: Type and colour coding
- Status timestamp: When it was checked in or redeemed
Admitting Tickets
To manually mark a ticket as admitted:
- Find the order using search or by scrolling through the register
- Locate the specific ticket in the order
- Click the check button (grey circle) next to the ticket
- The button turns green with a tick mark
- Status updates to show: "Checked in on [date and time]"
The admission is recorded immediately and visible to all users viewing the register.
Reversing Admission
If you need to reverse an admission (ticket checked in by mistake):
- Click the green check button with the tick
- The ticket returns to not-admitted state
- Status updates to show: "Checked out on [date and time]"
This creates an audit trail showing both the admission and removal.
Redeeming Merchandise
Merchandise items (extras, programmes, refreshments, vouchers) appear in the same register as tickets:
To mark merchandise as redeemed:
- Find the order containing the merchandise item
- Locate the item row (merchandise items are listed separately from tickets)
- Click the check button next to the item
- Status updates to show: "Redeemed on [date and time]"
Merchandise redemption works identically to ticket admission, but uses different terminology to reflect the action.
What Counts as Merchandise?
Merchandise items include:
- Event extras (programmes, refreshments, parking)
- Add-on items bundled with tickets
- Vouchers for collection
- Special packages requiring physical collection
These are configured in your event's ticket category settings with the "Merchandise" flag enabled.
Search and Find
The search feature helps locate specific orders quickly:
Search by:
- Order number: Enter the order ID (e.g., 12345)
- Email address: Full or partial email
- Name: Attendee first or last name
To use search:
- Click in the search box at the top
- Type your query
- Press Enter or click search
- Results filter to matching orders only
Tip: For order numbers, just type the digits without the # symbol.
Working with Multiple Event Dates
The Admit & Redeem system is designed to handle events with multiple performances or sessions:
Day View
Select a full day from the side menu to see:
- All event dates occurring on that day
- Orders grouped by individual event time
- Combined register for multiple performances
This is useful for matinee/evening shows or festivals with multiple sessions per day.
Individual Event Date
Select a specific event date to see:
- Only orders for that exact date and time
- Focused register for single-performance tracking
- Faster loading for events with many dates
Sorting and Organisation
The register is automatically sorted for efficient check-in:
Primary sort: Event date and time (chronological) Secondary sort: Ticket category Tertiary sort: Attendee name (alphabetical)
Within each order, tickets are sorted by:
- Merchandise items first (if applicable)
- Seat section/row
- Seat number (numerical order)
This organisation makes it easy to process attendees systematically.
Real-Time Collaboration
Multiple staff members can use Admit & Redeem simultaneously:
Important considerations:
- Changes are not automatically visible to other users
- Click Refresh regularly to see updates from other devices
- Admission status updates immediately across the system
- The system prevents conflicting updates (you cannot check in a ticket that is already checked in)
Best practice: Refresh the page every few minutes during active check-in periods.
Permission Requirements
Requires the Admit & redeem permission for the event's organisation.
Use Cases and Scenarios
Lost Phone Scenario
Customer arrives without their mobile ticket (dead battery):
- Search for the order by name or email
- Verify customer identity (ask for ID or order confirmation)
- Manually admit their tickets using the check button
- Customer gains entry without QR code
Merchandise Collection
Event includes programmes purchased with tickets:
- Customer presents ticket at collection point
- Staff find their order in Admit & Redeem
- Mark merchandise item as redeemed
- Customer collects their programme
Door List Entry
VIP guests on complimentary tickets without printed tickets:
- Create comp ticket orders in advance
- Use Admit & Redeem as door list
- Check guests in manually as they arrive
- Track which comp tickets were used
Technical Failure Fallback
Scanning devices stop working mid-event:
- Switch to Admit & Redeem on laptop/tablet
- Continue manual check-in using register view
- Maintain attendance tracking without interruption
- Fix scanning devices without stopping entry
Print-Friendly Format
The Admit & Redeem view is designed for printing:
- Automatic page breaks between event dates
- Print-friendly styling for clear readability
- Web-only buttons and menus are hidden when printing
- Useful for creating physical check-in sheets
To print: Use your browser's print function (Ctrl+P or Cmd+P).
Admin Notes
If orders have admin notes attached (internal staff notes), they appear in the register view:
Admin Notes section shows:
- Private notes about the order
- Special requirements or instructions
- Historical notes from previous events
These help staff handle special cases appropriately during check-in.
Empty States
If you see "No Tickets Found on Day":
- The selected date has no orders with tickets
- All tickets may have been cancelled or refunded
- The date might be outside your event's schedule
If prompted to select a date, choose an event date or day from the side menu to load the register.
Status Indicators
Visual feedback for each item:
Ticket Status:
- Grey button: Not admitted (awaiting check-in)
- Green button with tick: Currently admitted
- Loading spinner: Processing admission/removal
Merchandise Status:
- Grey button: Not redeemed (not yet collected)
- Green button with tick: Redeemed (collected)
Timestamp Display:
- Shows exact date and time of admission/redemption
- "Checked in" terminology for tickets
- "Redeemed" terminology for merchandise
Working with the Order System
Clicking the order button in any order row:
- Opens the full order details
- Shows complete purchase information
- Allows order modifications if needed
- Provides access to payment history
This integration lets you quickly move from check-in to order management.
Audit Trail
Every admission and redemption action creates an audit trail:
Tracked information:
- Date and time of admission/redemption
- Date and time of reversal (if checked out)
This provides accountability and helps resolve disputes about entry.
Event Date Information
The system intelligently handles event scheduling:
- Displays event time in local timezone
- Shows day name and full date
- Groups by logical event performance
- Filters orders to relevant date/time only
Technical Integration
The Admit & Redeem system integrates with:
- Order system: Real-time order data and attendee information
- Ticket scanning: Automatic admission when QR codes are scanned
- Permission system: Organisation-level access control
- Event dates: Multi-date event support
- Merchandise flags: Category-based merchandise identification
Performance Notes
The system is optimised for efficient operation:
- Loads only orders for selected date/day
- Processes check-in/checkout actions instantly
- Supports high-volume events with many tickets
- Handles multiple concurrent users
Related Features
- Ticket Scans: View automatic QR scan history
- Orders: Full order management and details
- Event Dates: Configure multiple event performances
- Ticket Categories: Set up merchandise vs ticket categories
- Organisation Devices: Scanning device management
- Permissions: Control access to admission features
Best Practices
For smooth operation:
- Search first: Use search rather than scrolling for specific orders
- Refresh regularly: Keep status current when multiple staff are checking in
- Verify identity: Confirm customer details before manual admission
- Mark merchandise: Remember to mark extras as redeemed separately from tickets
- Print backup: Consider printing the register as physical fallback
- Use systematically: Work through the list in order during pre-event check-in
- Coordinate with scanning: Decide which method to use and communicate to all staff
Common Questions
Admission and Check-in
What happens if I accidentally check someone in? Click the green check button again to reverse the admission. The system records both the original check-in and the reversal, creating a complete audit trail.
Does checking in here also show in the Scans section? No. Manual admissions through Admit & Redeem appear only in this register. QR scans appear in the Scans section. Both methods update the same underlying admission status, but they are recorded separately.
Can multiple staff use this at the same time? Yes, but changes are not automatically visible to other users. Click Refresh regularly to see updates from other devices. The system prevents conflicts - you cannot check in a ticket that is already checked in.
Merchandise
How do I know which items are merchandise? Merchandise items appear in the same register as tickets but show "Redeemed" instead of "Checked in" when marked. These are items configured with the Merchandise setting enabled in your ticket categories.
Can I redeem merchandise without admitting the ticket? Yes. Tickets and merchandise items are tracked independently. You can mark merchandise as redeemed at a collection point while the ticket remains un-admitted until the attendee enters the venue.
Searching and Filtering
What can I search for? You can search by order number (just the digits, no # symbol needed), attendee name, or email address.
Why am I seeing "No Tickets Found on Day"? Either the selected date has no orders, all tickets have been cancelled or refunded, or you may have selected a date outside your event's schedule.
Troubleshooting
Cannot find an order? Check you have selected the correct event date. Try searching by order number instead of name. Verify the order was not cancelled or refunded.
Button will not change state? Check your internet connection. Refresh the page to reload current status. Verify you have the correct permissions.
Changes not appearing? Click the Refresh button to load latest data. Another user may have updated the status. Check you are viewing the correct event date.